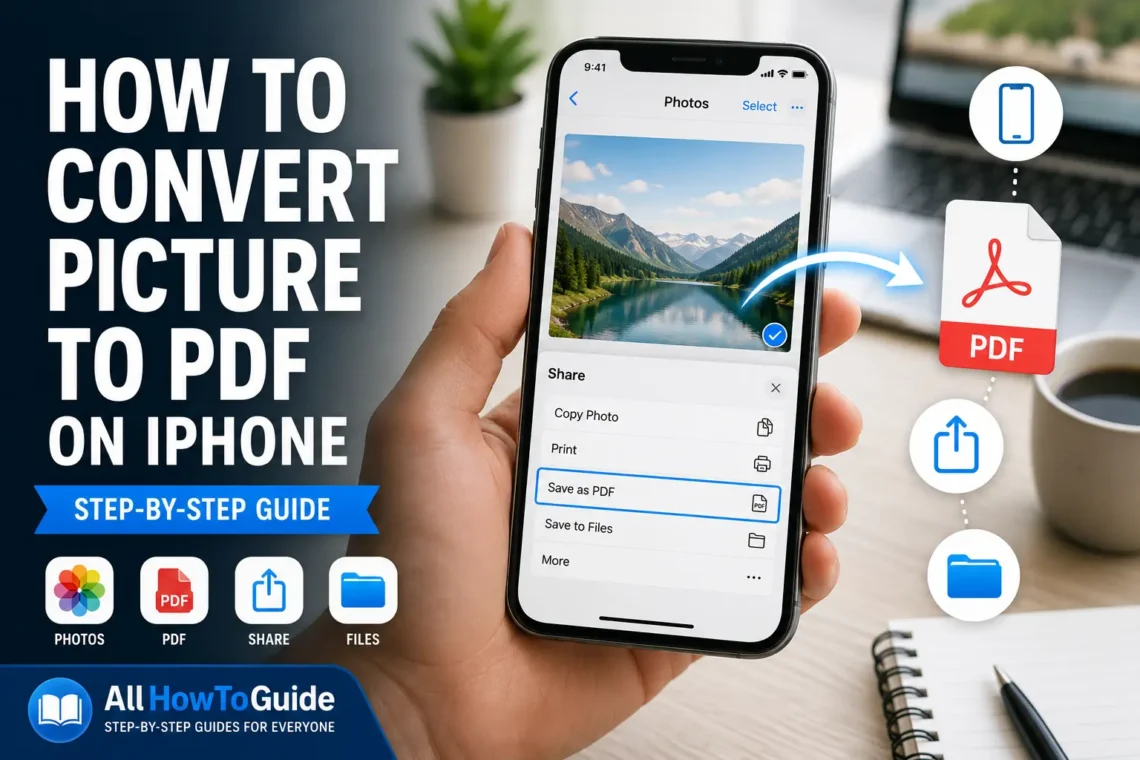
If you’ve ever needed to send a document, receipt, ID, or handwritten notes from your iPhone, you’ve probably wondered how to convert picture to PDF on iPhone. The good news is that you don’t need to install any extra apps. Apple’s built-in tools make it simple to turn one or multiple photos into a PDF in just a few taps.
PDF files are widely accepted because they preserve formatting, are easy to share, and look professional on almost any device. Whether you’re submitting homework, sending business documents, or organizing personal files, knowing how to create a PDF from photos is a useful skill.
This guide walks you through every reliable method, explains when to use each one, and includes troubleshooting tips to help you avoid common problems.
Why Convert a Picture to a PDF?
While JPEG and PNG images work well for photos, PDFs are often preferred for documents.
Converting your pictures into PDF format can help you:
- Share multiple images as one file
- Preserve image quality
- Make documents easier to print
- Upload files to websites that require PDFs
- Keep receipts and important records organized
For students, professionals, and everyday users, PDFs offer a cleaner and more organized way to share information.
If you’re using an iPhone after moving to another region, you may also need to update your Apple account settings. Our guide on How to Change Apple ID Country walks you through the process step by step.
Method 1: Convert Pictures to PDF Using the Files App
The Files app is one of the easiest built-in methods.
Step 1: Save the Photo to Files
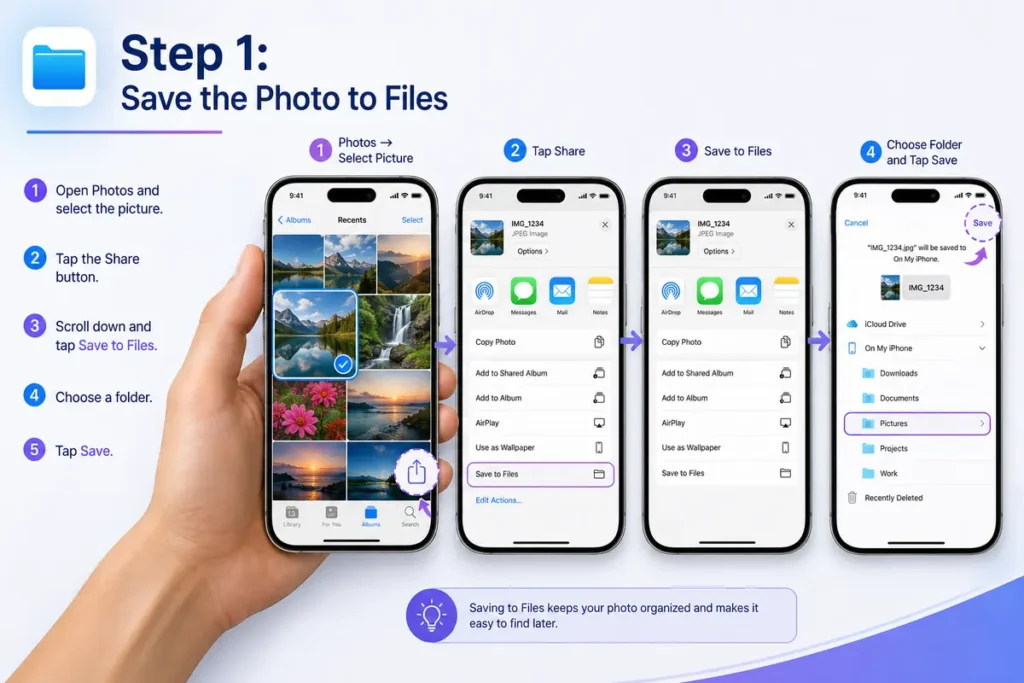
Open the Photos app.
Select the picture you want.
Tap Share.
Choose Save to Files.
Select a folder and tap Save.
Step 2: Create the PDF
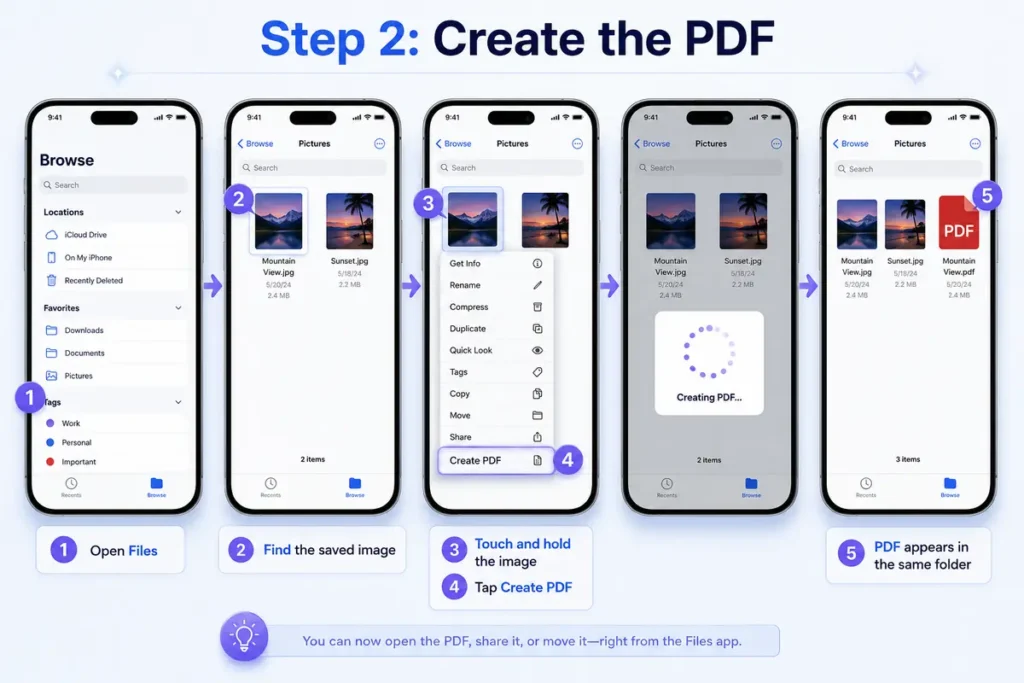
Open the Files app.
Navigate to the folder where you saved the image.
Touch and hold the image.
Tap Create PDF.
Your iPhone instantly creates a PDF in the same folder.
Learning built-in iPhone features can save time every day. You may also find our guide on How to Turn Off SOS on iPhone helpful if you’re customizing your device settings.
Method 2: Convert Photos to PDF Using the Print Feature
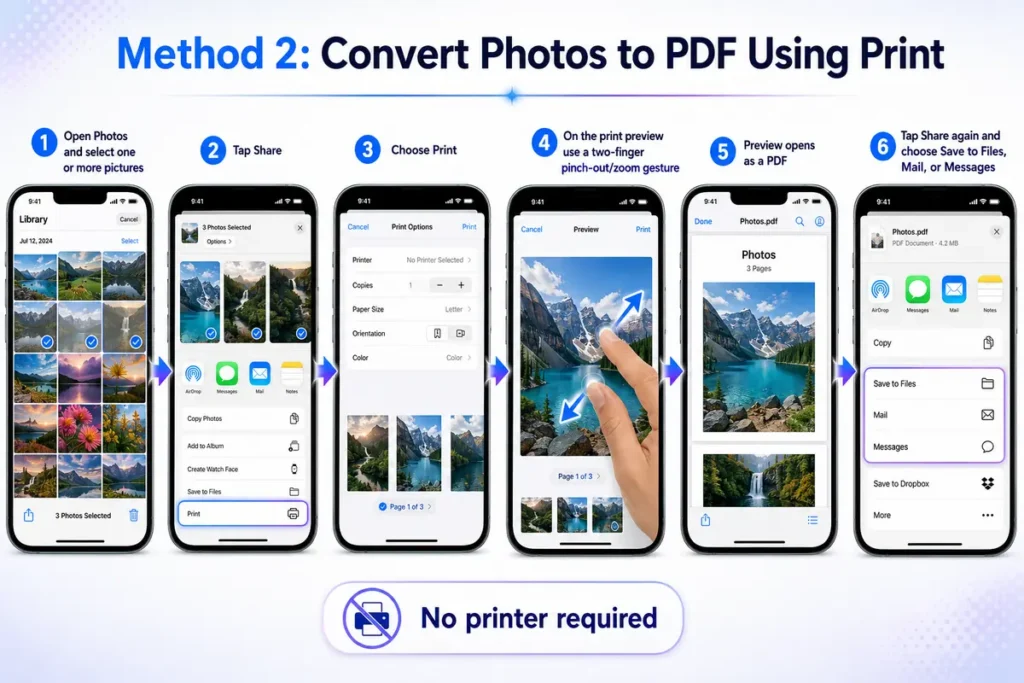
Many iPhone users don’t realize the Print menu can create PDFs.
Steps
Open the Photos app.
Select one or more pictures.
Tap Share.
Choose Print.
On the preview page, use two fingers to zoom in on the preview.
The preview opens as a PDF.
Tap Share again.
Choose Save to Files, Mail, Messages, or another sharing option.
No printer is required.
Method 3: Scan Documents Directly Into PDF
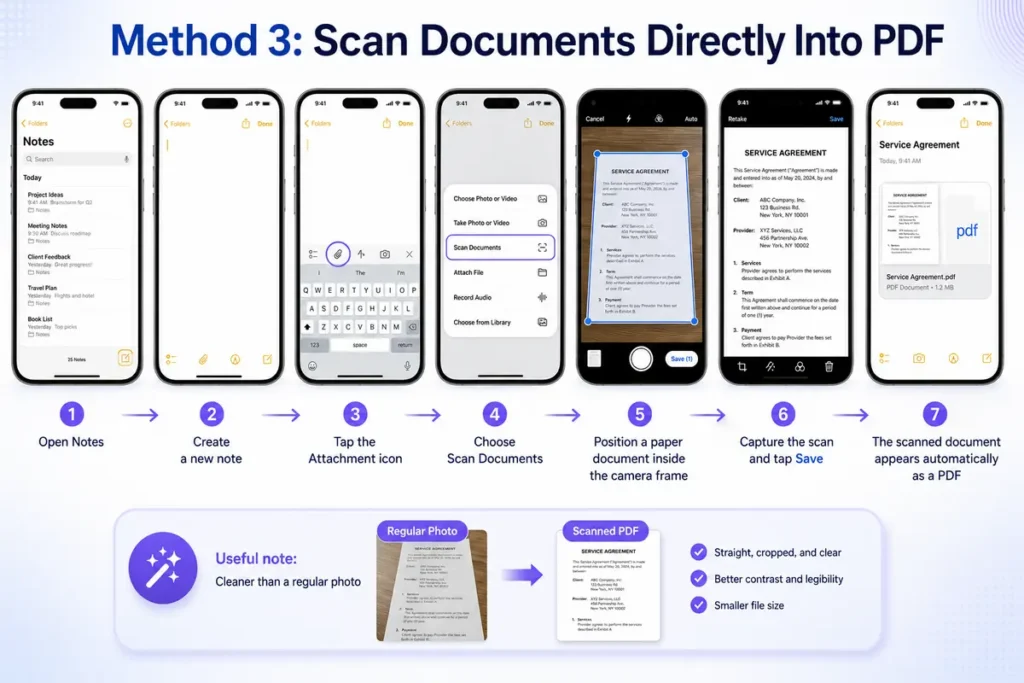
If you’re photographing paper documents, Notes provides an even better option.
Steps
Open the Notes app.
Create a new note.
Tap the Attachment icon.
Choose Scan Documents.
Position your document inside the camera frame.
Capture the scan.
Tap Save.
The scanned document is automatically saved as a PDF.
This method usually produces cleaner results than taking a regular photo.
How to Convert Multiple Pictures into One PDF
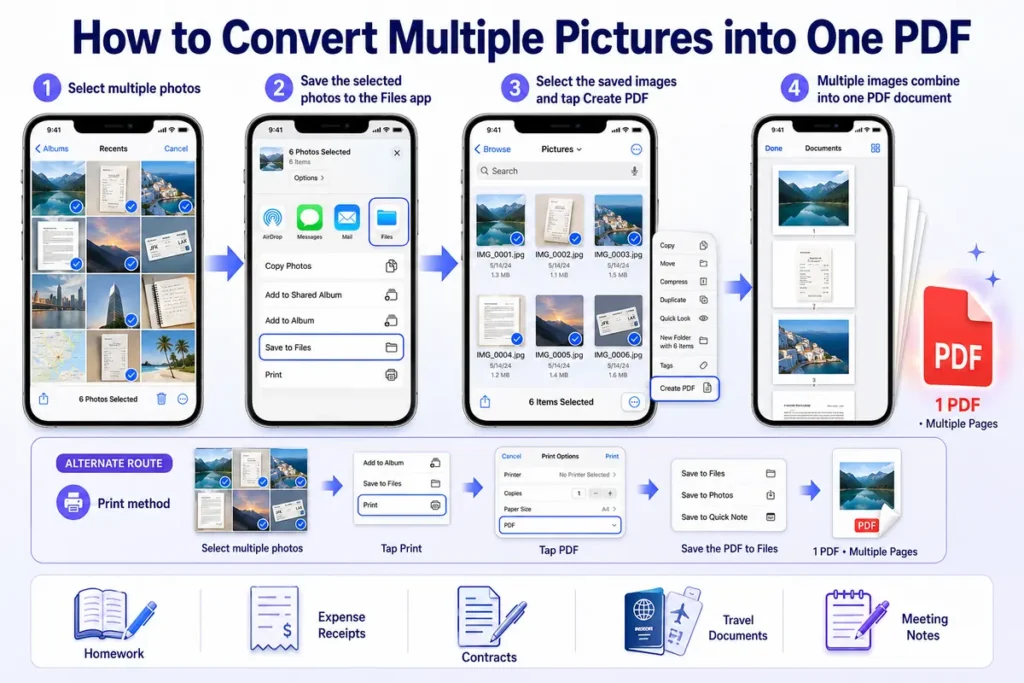
You can combine several photos into a single PDF.
Simply:
- Select all the photos you need.
- Save them to the Files app.
- Create a PDF from the saved images.
You can also use the Print method after selecting multiple photos, and they will appear together in one PDF.
This is useful for:
- Homework
- Expense receipts
- Contracts
- Travel documents
- Meeting notes
How to Share the PDF
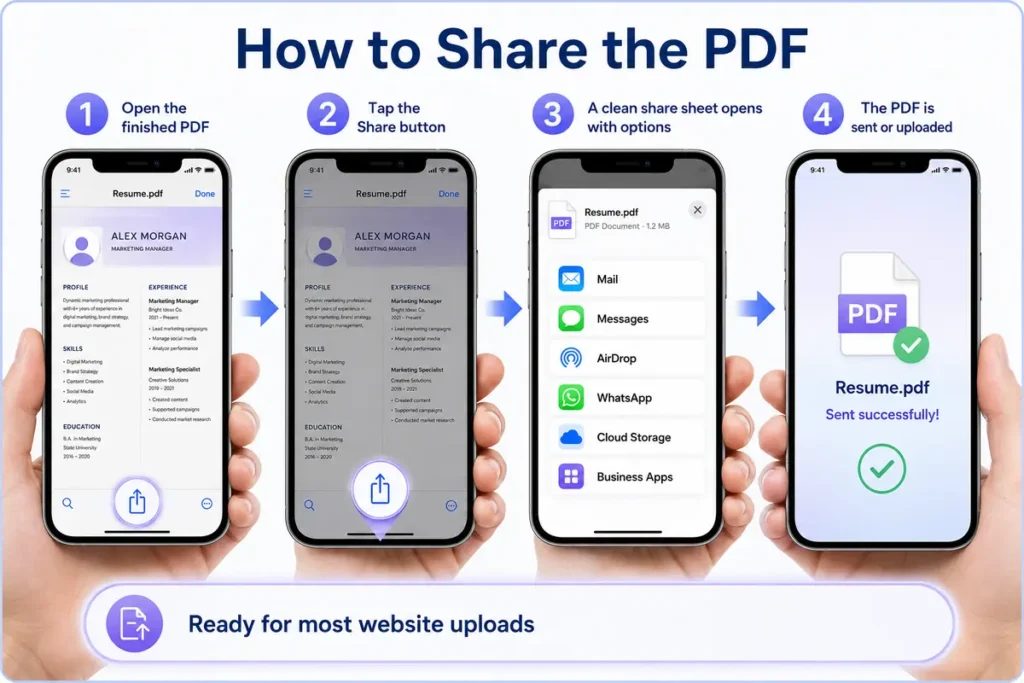
After creating your PDF, tap the Share button.
You can send it using:
- Messages
- AirDrop
- Cloud storage services
- Business apps
Most websites that request PDF uploads will accept these files immediately.
If you often organize work documents and spreadsheets, our tutorial on How to Sum a Column in Excel is another useful productivity guide.
Where PDFs Are Saved
Depending on the method you use, your PDF may be stored in:
- iCloud Drive
- On My iPhone
- Downloads folder
- Notes app
- A folder you selected in Files
Giving your PDF a descriptive file name makes it easier to find later.
Can You Edit the PDF Later?
Yes.
After saving the PDF, you can:
- Add signatures
- Highlight text
- Draw using Markup
- Rotate pages
- Share edited versions
For more advanced editing, you can also use third-party PDF editors if needed.
Working with spreadsheets too? Learn How to Subtract in Excel to perform quick calculations more efficiently.
Best Tips for Better PDF Quality
A clear original picture produces a better PDF.
For the best results:
- Use good lighting.
- Keep the camera steady.
- Avoid blurry images.
- Crop unnecessary backgrounds.
- Clean the camera lens before taking pictures.
- Scan documents on a flat surface.
Small improvements before conversion make the final PDF much easier to read.
Common Problems and Solutions
Sometimes the conversion process doesn’t work as expected.
PDF Looks Blurry
Take the photo again using better lighting or use the Notes document scanner.
Cannot Find “Create PDF”
Make sure the picture is saved inside the Files app first.
PDF Is Too Large
Crop unnecessary areas before converting or reduce image resolution using photo editing tools.
Multiple Photos Are Out of Order
Arrange the images in the desired order before creating the PDF.
PDF Won’t Upload
Verify that the website accepts PDFs and check your internet connection.
Should You Use Third-Party Apps?
For most people, Apple’s built-in tools are enough.
However, third-party apps may offer features such as:
- Password protection
- PDF compression
- Page reordering
- OCR (text recognition)
- Advanced editing
Unless you need those features regularly, the built-in options remain the fastest and simplest choice.
When Converting Photos to PDF Is Useful
Creating PDFs from photos is helpful in many everyday situations.
Examples include:
- Sending homework assignments
- Sharing signed contracts
- Uploading government documents
- Emailing receipts
- Creating travel records
- Storing medical paperwork
- Organizing personal files
Once you learn the process, you’ll likely use it more often than expected.
Privacy and Security Tips
Documents often contain personal information.
Before sharing your PDF:
- Double-check every page.
- Remove unnecessary photos.
- Verify the recipient’s email address.
- Store important files in secure folders.
- Delete temporary copies if they are no longer needed.
Protecting your personal information is just as important as creating the document.
Final Thoughts
Learning how to convert picture to PDF on iPhone is easier than many people think. Whether you use the Files app, the hidden Print feature, or the Notes document scanner, your iPhone already includes everything needed to create professional-looking PDF files without downloading extra software. Once you become familiar with these built-in tools, converting photos into PDFs takes only a few seconds and makes sharing, storing, and organizing important documents much more convenient.
Looking for more Apple tutorials? Check out our guides on How to Change AirTag Battery and How to Turn Off SOS on iPhone to get even more from your iPhone.
FAQs
1. Can I convert multiple pictures into one PDF on iPhone?
Yes. Select multiple images before using the Print or Files method to combine them into one PDF.
2. Do I need a PDF app?
No. iPhone includes built-in tools that can create PDFs without installing additional apps.
3. Will converting to PDF reduce image quality?
Generally, no. The PDF maintains good quality, especially when created from clear original photos.
4. Can I email the PDF directly?
Yes. After creating it, use the Share menu to send it through Mail or other supported apps.
5. Which method is best for scanning paper documents?
The Notes app’s Scan Documents feature usually provides the cleanest and most professional-looking results.
📱 Related iPhone & Productivity Guides
Looking for more Apple and productivity tutorials? Check out these helpful step-by-step guides: