

A squeaky floor can turn a quiet walk across your home into an annoying series of creaks and chirps. The noise often comes from loose floorboards, rubbing joints, or small gaps between flooring materials. Fortunately, many squeaks can be repaired without replacing the entire floor. If you’re wondering how to fix squeaky floors, the right solution usually depends on where the noise comes from and what type of flooring you have.
Some repairs take only a few minutes, while others require access beneath the floorboards or a little careful DIY work. This guide explains how to find the source of a squeak, choose the safest repair method, and quiet wooden floors, carpeted rooms, stairs, and upstairs floors without causing unnecessary damage.
Why Do Floors Squeak?
Floors typically squeak when two materials move and rub against each other under pressure. Although the sound may seem to come from the floor’s surface, the actual problem can be beneath it.
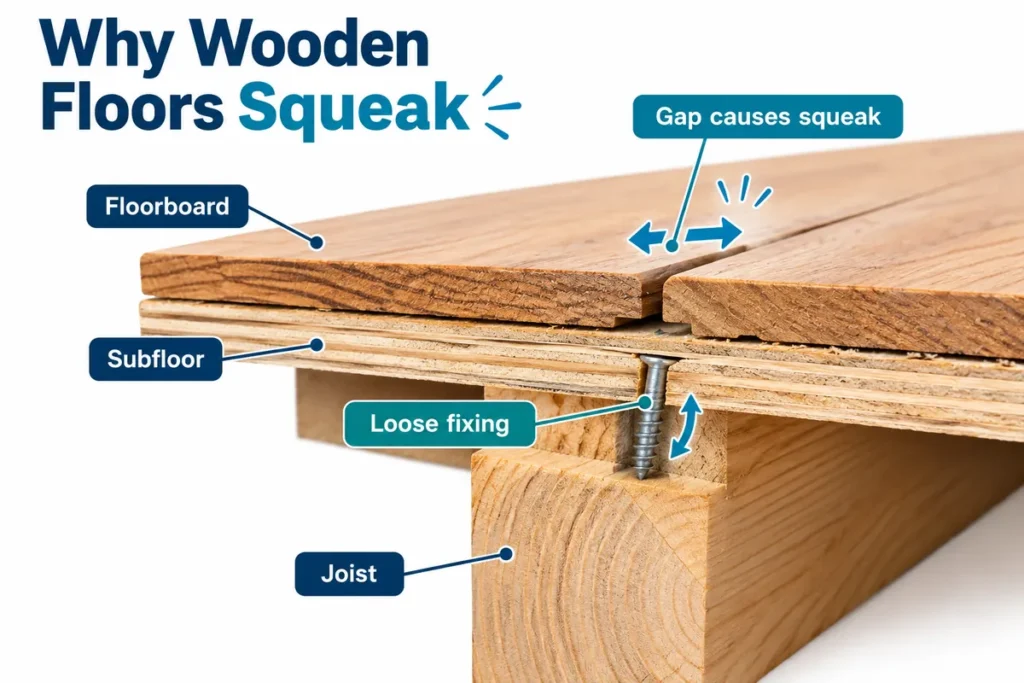
Common causes include:
- Loose floorboards: Nails or fixings no longer hold a board tightly, allowing movement when someone walks over it.
- Gaps between joists and subflooring: Small spaces let the subfloor move and rub against its supports.
- Timber expansion and contraction: Changes in humidity and temperature can cause wood to swell or shrink.
- Movement around nails: A loose board may rub against its nails, creating a sharp squeaking sound.
- Poorly secured subfloor panels: Plywood or oriented strand board (OSB) may move around their fixings.
- Rubbing floorboards: Adjacent wooden boards can make noise when their edges move against each other.
In older UK homes, traditional timber floorboards are often fixed directly to wooden joists. Over time, movement and changes in the timber can loosen their fixings, making squeaks more noticeable.
A squeak alone does not necessarily mean the floor is unsafe. However, noticeable sagging, excessive movement, or signs of water damage should be investigated before attempting a simple repair.
How to Find the Source of a Squeaky Floor
Before reaching for your tools, identify exactly where the sound is coming from. Repairing the wrong board or fixing can waste time and may create additional holes in the flooring.
Follow these steps:
- Walk slowly across the noisy section of the floor.
- Pay attention to the precise location of each squeak.
- Ask another person to walk across the floor while you listen.
- Mark the noisy area with a small piece of removable masking tape.
- Check whether the squeak happens near a floorboard joint, wall, or doorway.
- If safe access is available, inspect the underside of the floor while someone walks above.
Also, notice whether the flooring visibly moves when pressure is applied. A floorboard that shifts or lifts slightly may have loose fixings.
If the noise is concentrated in one small area, a local repair may be enough. Widespread squeaking may suggest several loose boards or an issue with the subfloor.
Tools and Materials You May Need
Most small squeaky-floor repairs require only basic tools. The exact materials depend on whether your floor is wooden, carpeted, or accessible from underneath.
| Tool or material | Purpose |
|---|---|
| Screwdriver or drill | Securing loose floorboards |
| Suitable flooring screws | Holding boards or subfloor panels securely |
| Timber shims | Filling small gaps beneath supported flooring |
| Wood adhesive or construction adhesive | Stabilising suitable gaps and joints |
| Wood filler | Concealing small holes in finished timber |
| Stud or joist detector | Helping locate structural supports |
| Hammer | Checking or adjusting certain loose fixings |
| Masking tape | Marking squeaky locations |
| Eye protection | Protecting your eyes during repairs |
Before driving screws or nails, check for electrical cables, water pipes, and heating pipes beneath the flooring. This is particularly important in UK homes, where services may run through or alongside timber joists.
A detector can help, but it cannot reliably rule out every hidden service. When the route of pipes or wiring is uncertain, avoid drilling until it has been established.
How to Fix Squeaky Floors: 9 DIY Methods
The best repair is one that stops unwanted movement without damaging the flooring. Start with the least invasive solution suitable for your floor type.
1. Tighten Loose Wooden Floorboards With Screws
Loose floorboards are one of the most common causes of squeaking. If a board moves against its fixings, securing it properly to the supporting joist can often eliminate the sound.
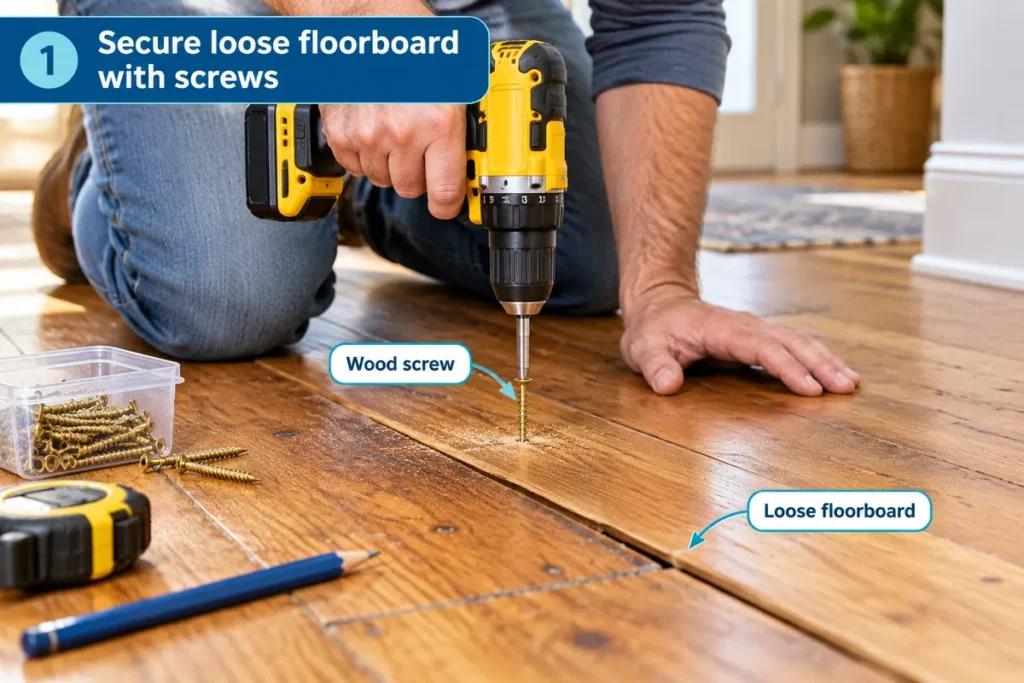
To repair a loose floorboard:
- Locate the board responsible for the squeak.
- Identify the supporting joist and check for hidden pipes or cables.
- Choose suitable wood screws for the board’s thickness and construction.
- Drill a pilot hole where appropriate to reduce the risk of splitting.
- Secure the floorboard to the joist without overtightening.
- Walk across the repaired area to check whether the noise has stopped.
For traditional timber floorboards, screws can provide a firmer fixing than loose nails. Use countersunk screws where appropriate so the heads sit below the finished surface.
Avoid putting screws into unknown areas, particularly where central heating or electrical services may be hidden.
2. Use Timber Shims to Close Small Gaps
If you can access the underside of the floor, a small gap between the subfloor and a joist may explain the squeaking.
A thin timber shim can sometimes prevent movement without lifting the floorboards.
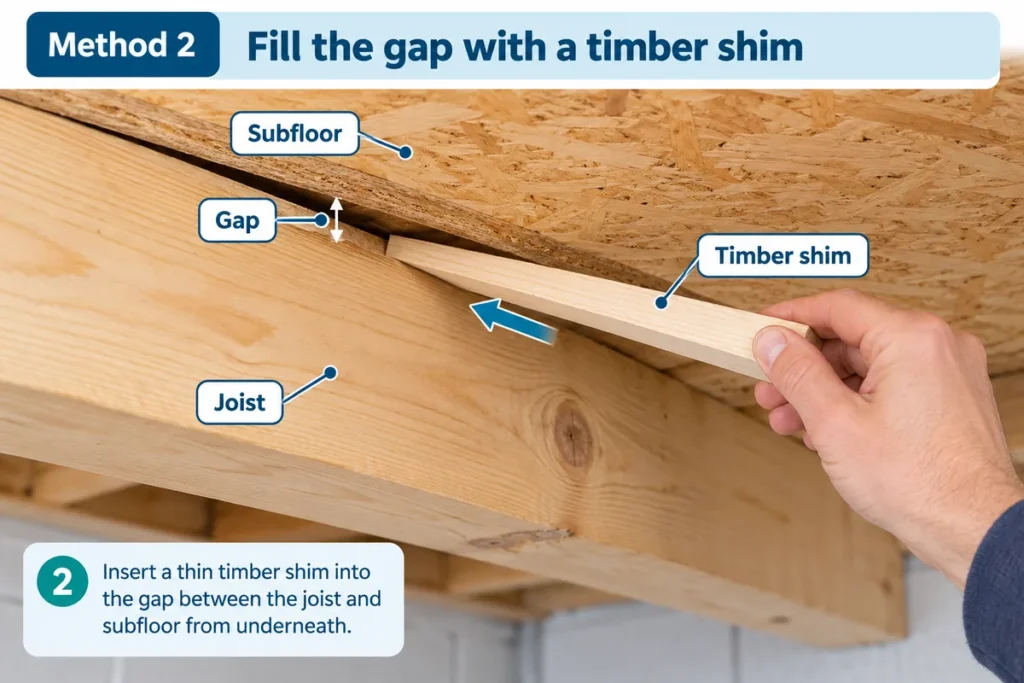
Follow these steps:
- Have someone walk across the floor while you observe the underside from a safe location.
- Identify a visible gap that moves when pressure is applied.
- Select a thin timber shim that fits the space.
- Apply a suitable adhesive if recommended for the repair.
- Gently slide the shim into the gap.
- Stop once the gap is supported and the movement has been reduced.
Do not hammer a thick shim tightly into place. Excessive force can lift or distort the flooring above.
This method is most useful when you have clear, safe access to the underside, such as from an accessible basement or during renovation work.
3. Apply Wood Adhesive to Suitable Loose Joints
Wood adhesive can sometimes help stabilise accessible timber joints that are causing friction.
For example, a small gap between a timber subfloor and its support may benefit from an appropriate construction adhesive, depending on the floor’s design.
Clean the area and remove loose dust before applying the product according to its instructions.
However, adhesive should not be used as a substitute for proper mechanical fixings where floorboards or structural panels need to be secured. Also, avoid gluing together edges of floating floors that are designed to expand and contract freely.
4. Reduce Friction Between Wooden Floorboards
Sometimes, floorboards squeak because their edges rub together rather than because they are loose.
On suitable unfinished timber floors, a small amount of dry, flooring-compatible lubricant may temporarily reduce friction.
For an accessible joint:
- Identify the specific joint producing the squeak.
- Check the flooring manufacturer’s care recommendations.
- Apply only a small quantity of a compatible dry lubricant if permitted.
- Remove excess material from the surface.
- Walk across the area and listen for improvement.
Avoid using household oils, grease, or general-purpose sprays. They can stain wood, attract dirt, damage finishes, or create a slippery surface.
Powdered products such as talc are sometimes suggested for squeaky floors, but they are not a reliable permanent repair and can create airborne dust. Fixing the movement is generally preferable.
5. Fix Squeaky Floors Under Carpet
A carpet can hide loose floorboards or subfloor panels, making it harder to identify the source of the noise.
If the squeak comes from the structure beneath the carpet, a specialised carpet-floor repair kit may allow suitable fixings to be installed without removing the entire carpet.

Here’s the general process:
- Locate the squeaky section by walking over the carpet.
- Identify the supporting joist using an appropriate method.
- Check the location of cables, pipes, and heating systems.
- Follow the repair kit manufacturer’s instructions.
- Use the correct fixing and depth-setting guide for the floor assembly.
- Check whether the squeak has stopped.
Some kits use specially designed breakaway screws that leave no protruding screw head after installation.
Do not simply drive ordinary screws through carpet. They can catch the fibres, damage the carpet, or leave a sharp fastening exposed.
If the subfloor is inaccessible or you cannot safely identify the services beneath it, lifting a small section of carpet with professional assistance may be the safer option.
6. Repair Squeaky Floors From Underneath
Where the underside is safely accessible, repairing the floor from below can preserve the visible flooring.
This approach is useful when the squeak comes from a gap between the joist and the subfloor or from a poorly supported connection.
To begin, have another person walk across the noisy section while you identify the area from below.
Depending on the cause, the repair may involve:
- Installing a thin shim in a small moving gap.
- Applying an appropriate construction adhesive to a suitable joint.
- Adding a properly fitted timber support block where the design permits.
- Securing loose subflooring with appropriate mechanical fixings.
Never place screws into the underside of a finished floor unless you know the complete floor thickness and can confirm the screw will not penetrate the walking surface.
Do not cut, drill, or notch structural joists to stop a squeak. Structural alterations require appropriate expertise.
7. Secure Loose Subfloor Panels
Many modern floors use plywood or OSB panels beneath carpet, engineered wood, vinyl, or laminate.
If these panels are inadequately secured, they can move against the supporting joists and create squeaking sounds.
Where the subfloor is exposed, adding correctly positioned screws may help stabilise it.
Make sure the screws are appropriate for the panel thickness, joist material, and floor construction. Follow the relevant flooring or panel manufacturer’s fastening recommendations.
Also, check for damaged panel edges, moisture-related swelling, or gaps caused by movement.
A badly damaged subfloor panel may require replacement rather than simply adding more screws.
8. Control Indoor Humidity
Timber naturally responds to changes in moisture. When indoor humidity rises, wood can expand. When the air becomes drier, it can shrink.
These changes sometimes increase friction between boards or reveal gaps that make squeaking more noticeable.
To manage humidity:
- Check indoor conditions using a hygrometer.
- Investigate dampness, leaks, or condensation.
- Maintain adequate ventilation.
- Avoid exposing timber floors to unnecessary moisture.
- Follow the flooring manufacturer’s recommended indoor humidity range.
For many wood flooring products, maintaining reasonably stable indoor conditions is helpful. The ideal range varies by manufacturer and installation, so follow the guidance for your particular floor.
Humidity control can reduce seasonal movement, but it will not reliably repair boards that have already become loose.
9. Replace Damaged Floorboards When Necessary
If a floorboard is split, rotten, badly warped, or no longer securely supported, replacing it may be more effective than trying repeated temporary fixes.
Start by checking the extent of the damage and confirming whether the problem is limited to the board.
A damaged board may be removable and replaceable using matching timber, but older floors can contain hidden services immediately beneath the boards.
Cutting through flooring without checking for pipes and electrical cables is dangerous.
If the floor feels soft, shows signs of water damage, or has damaged supporting joists, contact a qualified flooring professional or builder before continuing.
How to Fix Squeaky Floors Without Removing the Flooring
Removing carpet, laminate, or finished wooden flooring can be inconvenient and expensive. Fortunately, some squeaks can be repaired without lifting the surface.
The method depends on the floor type:
| Flooring type | Possible repair without lifting it |
|---|---|
| Exposed wooden floorboards | Refasten a loose board to its joist |
| Carpeted timber floor | Use a compatible specialist repair kit |
| Floor accessible from underneath | Install a suitable shim or support |
| Engineered wood | Check for installation or subfloor movement |
| Laminate flooring | Address humidity or expansion issues where possible |
| Floating wooden flooring | Investigate expansion gaps and subfloor flatness |
For floating laminate and engineered wood floors, it is important not to screw the flooring directly to the joists. Floating floors are intended to move as a complete surface.
If the noise results from an uneven subfloor or incorrect expansion gaps, a proper fix may require lifting some of the flooring.
How to Fix Squeaky Floors Upstairs
Upstairs squeaks are especially frustrating because sound can travel through the ceiling into the room below.
Traditional upstairs floors in UK homes often consist of timber boards secured to wooden joists. Loose fixings, movement at board joints, or gaps between the boards and joists can produce noise whenever someone walks across them.
Begin by marking the exact location of the squeak.
If you have exposed floorboards, carefully inspect the fixings and look for signs of movement. A securely fitted screw into a confirmed joist can sometimes solve a local squeak.
If the floor is carpeted, a specialist repair kit may be suitable, provided the floor construction and hidden service locations are known.
Avoid assuming that upstairs joists are free of pipes or electrical cables. Bathroom plumbing, radiator pipes, and wiring are often routed through floor spaces.
If you have access only from the room below, cutting into the ceiling is usually a more invasive option and should not be the first repair attempt.
How to Stop Squeaky Laminate and Engineered Wood Floors
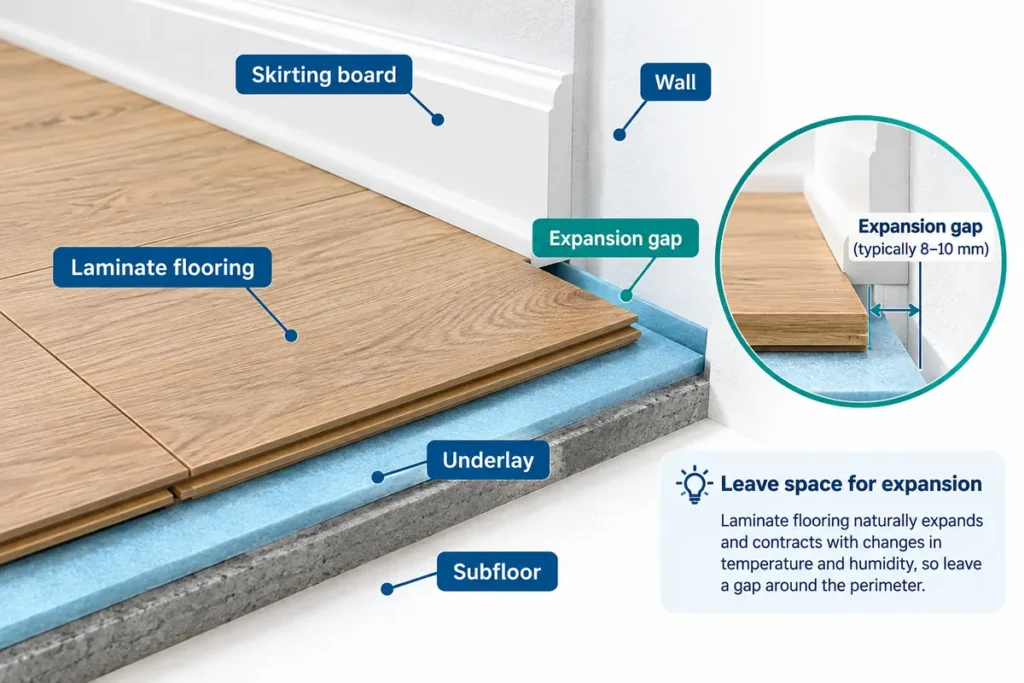
Laminate and engineered wood floors can make noise for reasons different from traditional timber floorboards.
Many products are installed as floating floors, meaning the boards interlock and rest over an underlay rather than being fastened directly to the joists.
Common reasons for squeaking or clicking include uneven subflooring, insufficient expansion space around the room, unsuitable underlay, and moisture-related movement.
Before attempting repairs, inspect the perimeter of the flooring and check for signs of buckling or raised joints.
A floating floor needs the expansion clearance specified by its manufacturer. If it is tightly trapped beneath skirting boards or against fixed objects, movement may cause unwanted noise.
Replacing an unsuitable underlay, correcting subfloor irregularities, or restoring the required expansion gap may help.
However, some of these repairs require partial removal of the flooring. Avoid driving screws through floating laminate or engineered wood, as this can restrict movement and cause further damage.
How to Fix Squeaky Stairs
Squeaky stairs can resemble squeaky floors, but their construction is different.
A staircase typically includes treads, risers, and supporting components known as strings or stringers. Noise may occur when connections between these parts become loose.
If the underside of the stairs is accessible, look for movement between a tread and riser while another person carefully applies pressure from above.
Small gaps may sometimes be repaired using suitable adhesive, support blocks, or appropriate fixings, depending on the staircase construction.
Avoid adding screws randomly through stair treads, particularly near visible joints or hidden services.
If a step feels unstable, moves significantly, or shows signs of structural deterioration, have it inspected by a qualified carpenter.
Common Mistakes to Avoid When Fixing Squeaky Floors
A floor repair should remove unwanted movement rather than simply hide the sound. Some common DIY mistakes can make the problem worse.
- Using screws without checking beneath the floor: Hidden plumbing and electrical cables can be damaged.
- Overtightening screws: Excessive force can strip fixings or damage timber.
- Forcing shims into gaps: Thick shims may lift the subfloor and create uneven areas.
- Applying too much lubricant: Excess products can stain or contaminate flooring.
- Screwing down floating floors: This can prevent normal expansion and lead to buckling.
- Ignoring water damage: A noisy floor affected by dampness may need more than a simple fastening repair.
- Using adhesive instead of structural fixings: Adhesive alone may not adequately secure flooring that requires mechanical support.
Take time to identify the floor construction before choosing a repair method. A solution that works on exposed timber boards may be completely unsuitable for laminate or carpeted floors.
How Much Does It Cost to Fix Squeaky Floors?
The cost of repairing squeaky floors depends on the cause, floor type, accessibility, and amount of work required.
A small repair involving a few loose screws may cost very little if you already have suitable tools.
Specialist carpet repair kits, timber shims, adhesives, or replacement boards add to the material cost.
More complicated problems, such as damaged subfloor panels or structural joists, can require professional work and may involve lifting floor coverings.
In the UK, labour rates vary by location and trade professional. Before hiring someone, request a written quotation explaining the likely cause, repair method, and whether flooring removal is included.
For a single noisy board, a local repair is usually worth investigating before considering replacement of the entire floor.
When Should You Call a Professional?
Most isolated squeaks are not emergencies. However, there are situations where professional inspection is the safer choice.
Consider contacting a carpenter, flooring specialist, or appropriately qualified builder if:
- The floor visibly sags or feels unusually soft.
- Several boards move noticeably when walked on.
- There are signs of rot, leaks, or ongoing dampness.
- Squeaking is accompanied by significant cracking or structural movement.
- You suspect damaged joists or inadequate support.
- Electrical cables, plumbing, or heating pipes prevent safe access.
- Previous repairs have failed to stop the movement.
If the squeak has developed suddenly alongside significant floor movement, avoid placing heavy loads on the affected area until it has been inspected.
How to Prevent Floors From Squeaking Again
Once you have fixed the noise, basic maintenance may help reduce the chances of it returning.
Maintain reasonably stable indoor humidity and address water leaks promptly. Excessive moisture can affect timber flooring and supporting structures.
When installing new flooring, make sure the subfloor is flat, dry, and properly secured according to the manufacturer’s requirements.
Use the correct fixings and leave suitable expansion gaps where the flooring system requires them.
Avoid repeatedly soaking wooden floors during cleaning, and check any recurring movement before it worsens.
Although natural timber movement cannot be eliminated entirely, careful installation and timely maintenance can help keep floors quieter for longer.
FAQs
What is the easiest way to fix a squeaky floor?
For a loose exposed timber floorboard, securing it to a confirmed joist with suitable screws is often a straightforward repair. Always check for hidden pipes and cables first.
Can you fix squeaky floors without removing carpet?
Yes, some squeaks beneath carpet can be repaired using specialist kits designed for carpeted timber floors. Their suitability depends on the flooring construction and safe access to the joists.
Why does my floor squeak when I walk on it?
The noise usually comes from movement and friction between floorboards, fixings, subfloor panels, or joists. Changes in moisture can also contribute to timber movement.
Can WD-40 stop squeaky wooden floors?
General-purpose WD-40 sprays are not recommended as a routine solution for squeaky wooden floors. They may affect finishes or leave residue, and they do not fix loose structural connections.
Are squeaky floors a sign of structural damage?
Not necessarily. Many squeaks result from minor movement between otherwise sound flooring components. However, sagging, soft spots, significant movement, or water damage warrant professional inspection.
How do you fix squeaky floors from underneath?
If the underside is accessible, you may be able to fit thin timber shims, apply suitable construction adhesive, or install additional support where appropriate. The correct method depends on the construction and cause of movement.
Conclusion
Learning how to fix squeaky floors starts with finding the source of the noise. Loose wooden boards may need better fixings, small gaps beneath subflooring may benefit from carefully fitted shims, and carpeted floors may be repairable with specialist tools. Laminate and engineered wood floors often require a different approach because they may be installed as floating systems.
For a long-lasting result, focus on correcting movement rather than masking the squeak. Always check for hidden services before drilling or cutting, and seek professional advice when a floor shows signs of structural damage. With the right diagnosis and a suitable repair method, many noisy floors can become noticeably quieter without a complete replacement.

