
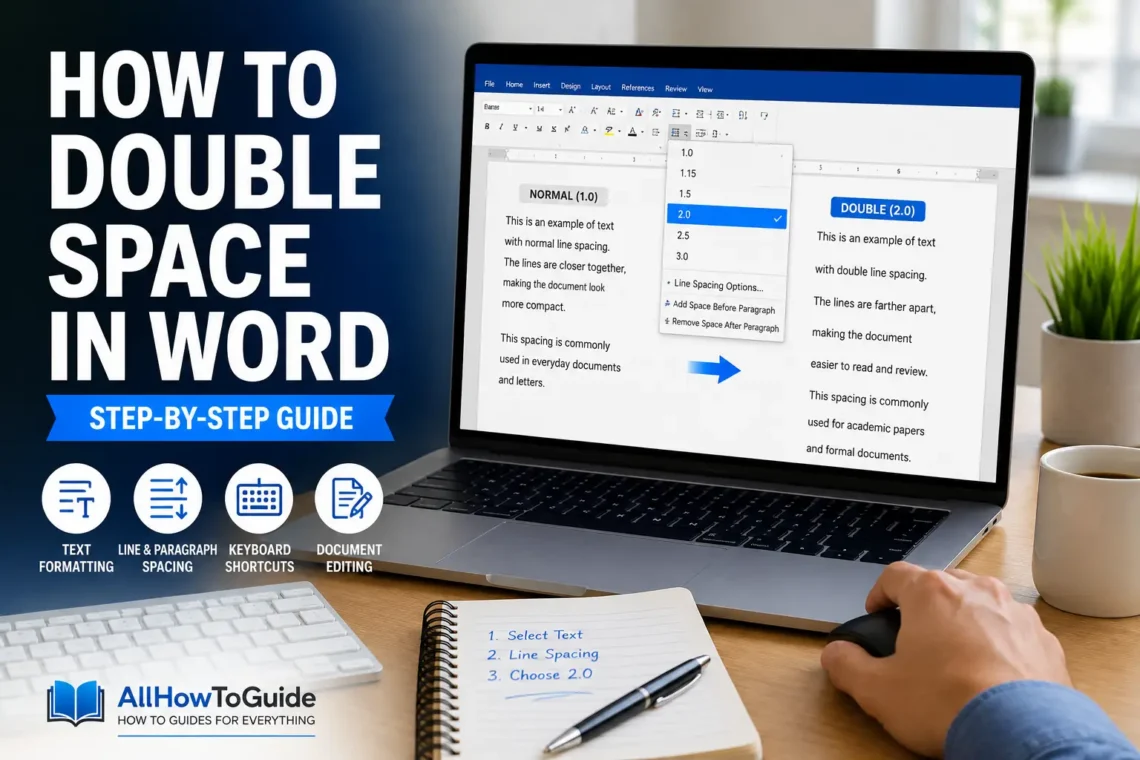
Formatting plays a major role in making documents easier to read, whether you’re writing a school assignment, a business report, a research paper, or a professional letter. One of the most common formatting requirements is double spacing, especially for academic writing styles like MLA, APA, and Chicago.
If you’re wondering how to double space in Word, the good news is that Microsoft Word makes the process quick and straightforward. However, the exact steps can vary slightly depending on whether you’re using Word on Windows, Mac, or Microsoft 365.
In this guide, you’ll learn several ways to apply double spacing, how to make it the default for future documents, and how to troubleshoot common spacing issues.
What Does Double Spacing Mean?
Double spacing simply means there is a full blank line between each line of text. Instead of placing lines close together, Microsoft Word increases the space between them, making documents easier to read and edit.
Many schools, universities, publishers, and employers require double spacing because it leaves room for comments, corrections, and handwritten notes.
You’ll commonly see double spacing used in:
- College essays
- Research papers
- Reports
- Manuscripts
- Legal documents
- Business drafts
Why Use Double Spacing?
Double spacing isn’t just about following formatting rules. It also improves readability.
When text is tightly packed together, readers may find it difficult to follow long paragraphs. Adding extra space between lines reduces visual clutter and makes editing much easier.
It’s especially helpful when:
- Teachers need room for feedback.
- Editors mark corrections.
- Large documents become easier to scan.
- Printed pages are more comfortable to read.
If you’re formatting an academic paper, you may also need to learn how to do a hanging indent on Word, which is commonly required in APA and MLA formatting.
Method 1: How to Double Space an Entire Word Document
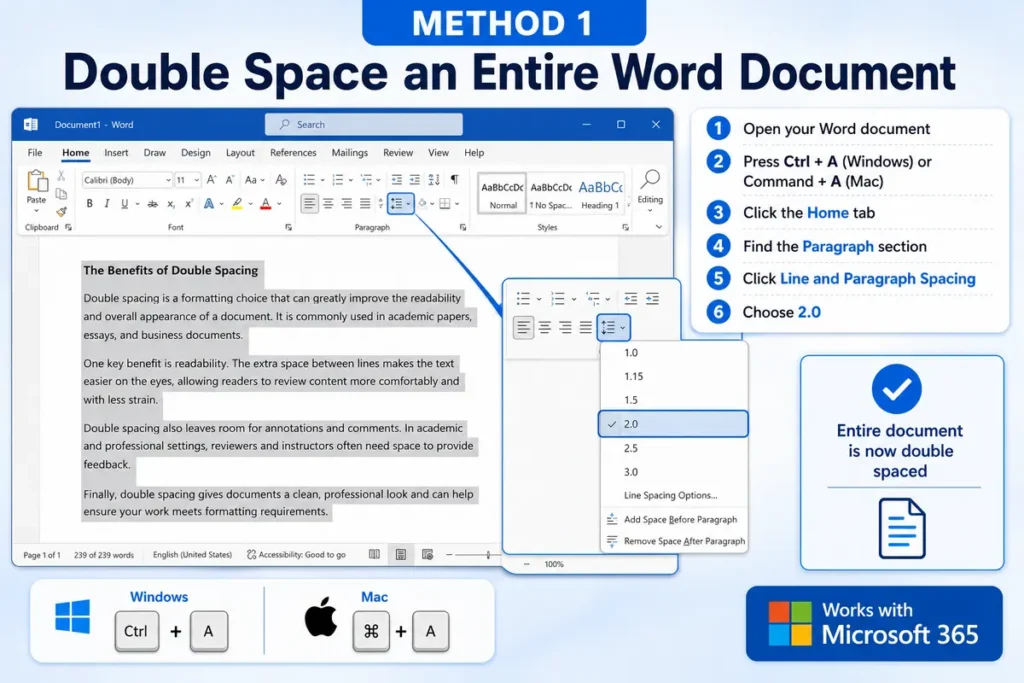
If you’re starting a new document or want every paragraph to have the same spacing, this is the easiest method.
Steps
- Open your Microsoft Word document.
- Press Ctrl + A (Windows) or Command + A (Mac) to select all text.
- Click the Home tab.
- Locate the Paragraph section.
- Select the Line and Paragraph Spacing button.
- Choose 2.0 from the dropdown menu.
Your entire document will instantly switch to double spacing.
This method works in most recent versions of Microsoft Word, including Microsoft 365.
After adjusting your document’s spacing, you can also follow our guide on how to add page numbers in Word to complete the formatting.
Method 2: Double Space Only Part of a Document
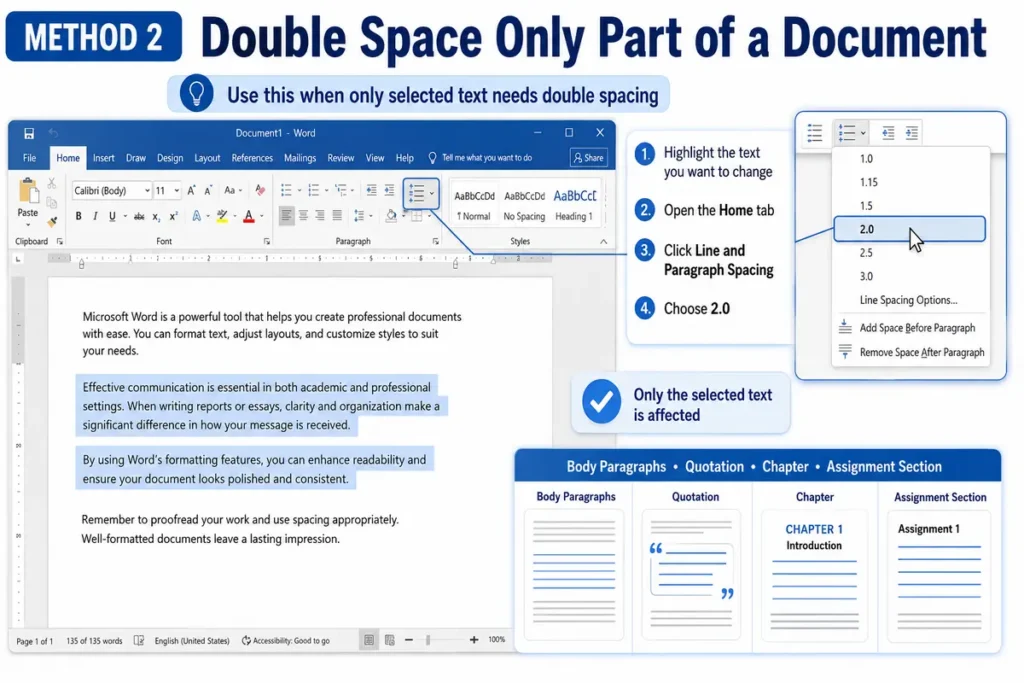
Sometimes you don’t want the entire document double spaced.
For example, you may only need:
- Body paragraphs
- A quotation
- A chapter
- An assignment section
In that case:
- Highlight only the text you want to change.
- Open the Home tab.
- Click Line and Paragraph Spacing.
- Choose 2.0.
Only the selected text will be affected.
Method 3: Use the Paragraph Settings Window
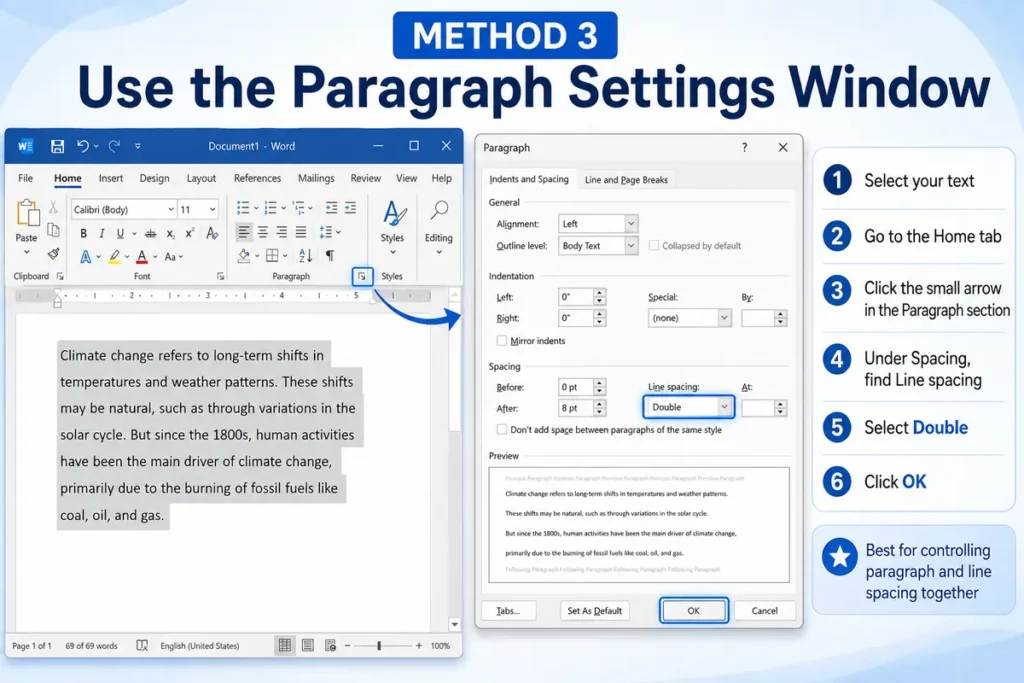
If you want more control over spacing, the Paragraph dialog box offers additional formatting options.
Steps
- Select your text.
- Go to the Home tab.
- Click the small arrow in the bottom-right corner of the Paragraph section.
- Under Spacing, find Line Spacing.
- Select Double.
- Click OK.
This method is useful when you’re adjusting paragraph spacing and line spacing together.
How to Double Space in Word on Mac
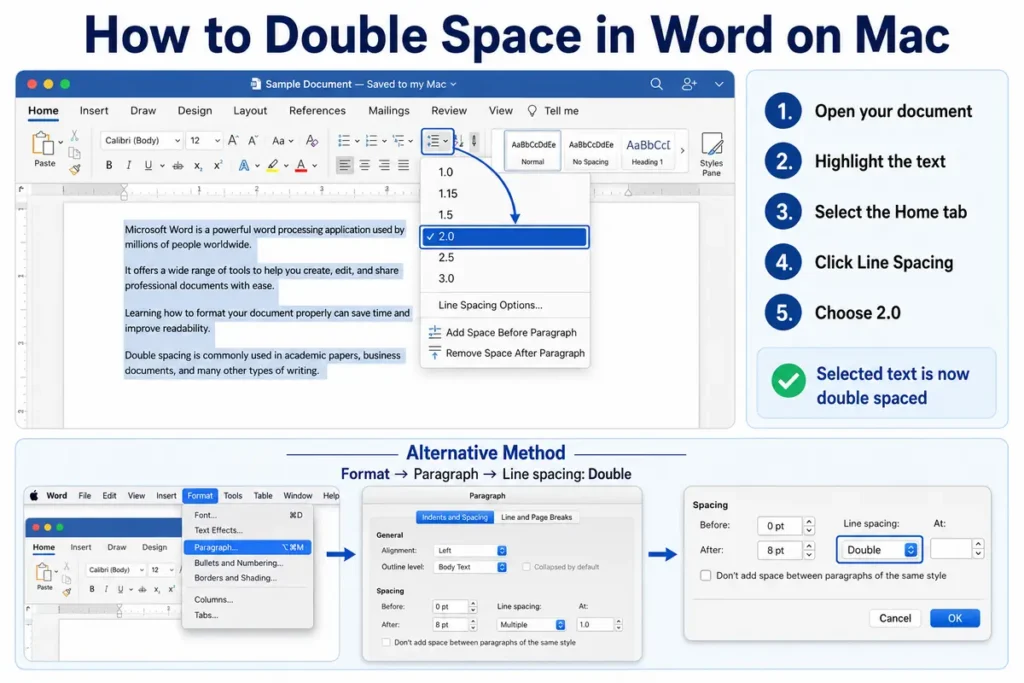
Microsoft Word for Mac uses a similar layout, although some buttons appear slightly different.
To apply double spacing:
- Open your document.
- Highlight the text.
- Select the Home tab.
- Click Line Spacing.
- Choose 2.0.
Alternatively, open the Format menu and select Paragraph, then change the line spacing to Double.
How to Make Double Spacing the Default
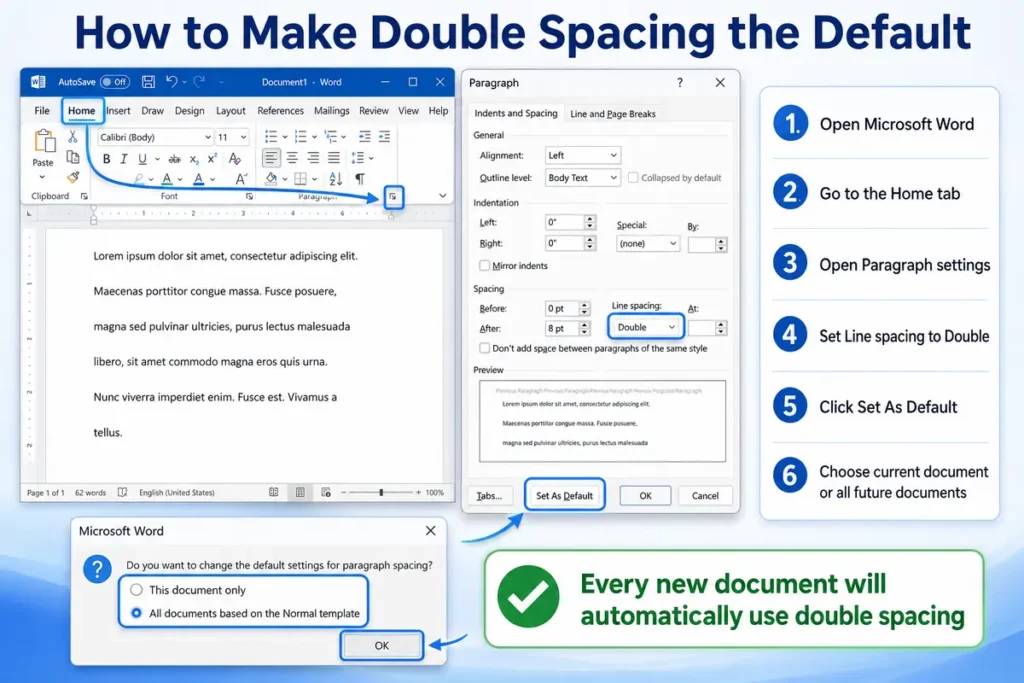
If you regularly create essays or reports, changing the default settings can save time.
Here’s how:
- Open Microsoft Word.
- Go to the Home tab.
- Open the Paragraph settings.
- Set Line Spacing to Double.
- Click Set As Default.
- Choose whether to apply it to the current document or all future documents.
From that point forward, every new document will automatically use double spacing.
Keyboard Shortcuts That Save Time
Microsoft Word includes several shortcuts that make formatting much faster.
Useful shortcuts include:
| Shortcut | Function |
|---|---|
| Ctrl + A | Select all text |
| Ctrl + C | Copy |
| Ctrl + V | Paste |
| Ctrl + Z | Undo |
| Ctrl + Y | Redo |
Although Word doesn’t have a universal keyboard shortcut for double spacing itself, selecting all text with Ctrl + A makes applying spacing much faster.
Double Spacing vs Paragraph Spacing
Many people confuse line spacing with paragraph spacing, but they’re different.
Double spacing changes the distance between every line within a paragraph.
Paragraph spacing adds extra space before or after entire paragraphs.
If your document still looks uneven after applying double spacing, check whether Word has extra spacing set Before or After paragraphs.
You can adjust these settings inside the Paragraph dialog box.
Common Problems and How to Fix Them
Formatting issues are usually easy to solve once you know what’s causing them.
Extra Blank Space Between Paragraphs
Word may have automatic paragraph spacing enabled.
Open Paragraph Settings and set Before and After spacing to 0 pt if required.
Double Spacing Doesn’t Apply
Make sure the correct text is selected before changing the spacing.
If nothing changes, clear the formatting and try again.
Different Parts of the Document Have Different Spacing
This usually happens when text has been copied from websites or PDFs.
Select the affected text and reapply the formatting manually.
Formatting Changes After Pasting
Instead of using regular paste, choose Keep Text Only to remove unwanted formatting.
Tips for Professional Document Formatting
Double spacing is only one part of creating a polished document.
For professional results:
- Use consistent fonts.
- Choose readable font sizes such as 11 or 12 points.
- Align text properly.
- Use standard margins unless instructed otherwise.
- Keep headings consistent throughout the document.
- Save your work regularly.
Small formatting details make documents look much more professional.
If you’re working with spreadsheets as well, our tutorials on how to create a drop-down list in Excel and how to sum a column in Excel can help improve your productivity.
Final Thoughts
Learning how to double space in Word is a simple but valuable skill that helps you create cleaner, easier-to-read documents. Whether you’re formatting a school assignment, writing a report, or preparing a manuscript, Microsoft Word provides several quick ways to apply double spacing. Once you understand the different methods and know where to find the paragraph settings, you’ll be able to format documents confidently in just a few clicks.
FAQs
1. What is the shortcut for double spacing in Microsoft Word?
There isn’t a dedicated shortcut, but you can press Ctrl + A to select all text and then choose 2.0 from the Line Spacing menu.
2. Does double spacing affect images?
No. It only changes the spacing between lines of text.
3. How do I remove double spacing?
Select the text, open Line and Paragraph Spacing, and choose 1.0 or your preferred spacing.
4. Is double spacing required for APA and MLA?
Yes. Both APA and MLA generally require double spacing throughout the document.
5. Can I make double spacing the default in Word?
Yes. You can change the default paragraph settings so every new document automatically uses double spacing.
📄 Related Microsoft Office Guides
Continue improving your Microsoft Office skills with these helpful tutorials: