Screen recording has become one of the most useful features available on modern computers. Whether you’re creating a tutorial, recording an online class, saving a video call, capturing gameplay, or reporting a technical issue, Chromebook makes the entire process surprisingly simple.
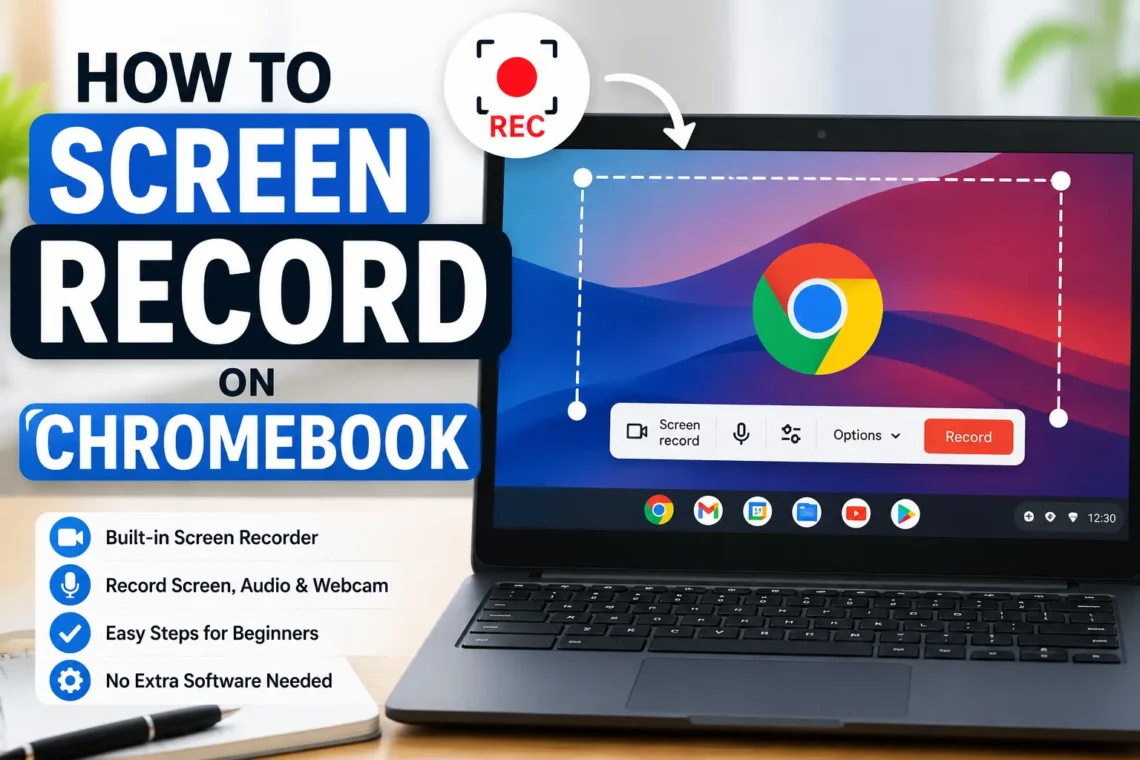
Many users think they need to install expensive software before they can record their screen. Fortunately, that’s no longer true. ChromeOS includes a built-in Screen Capture tool that lets you record your display within seconds. It supports recording the entire screen, a specific window, or just a selected area. You can even include audio and your webcam in many cases.
In this guide, you’ll learn everything you need to know, from using the built-in recorder to adjusting settings, solving common problems, and exploring alternative recording apps when you need extra features.
Why You Might Need Screen Recording on a Chromebook
Screen recording is useful in many everyday situations. Students can save online lectures for future review, teachers can create lessons, professionals can record presentations, and gamers can capture gameplay to share with friends.
Other common uses include:
- Creating step-by-step tutorials
- Recording virtual meetings
- Demonstrating software problems
- Saving online presentations
- Making YouTube videos
- Recording educational content
- Sharing technical support instructions
Since ChromeOS already includes this feature, most users can start recording immediately without downloading additional software.
Check if Your Chromebook Supports Screen Recording
Nearly every Chromebook running a recent version of ChromeOS includes the built-in Screen Capture feature.
To verify:
- Click the clock in the bottom-right corner.
- Select Screen Capture from the Quick Settings menu.
- If you see recording options, your Chromebook supports it.
If the option doesn’t appear, update ChromeOS by going to:
Settings → About ChromeOS → Check for Updates
Installing the latest update usually enables newer recording features and improves overall performance.
How to Screen Record on Chromebook Using the Built-in Tool
If you’re wondering how to screen record on Chromebook, the built-in recorder is the easiest solution.
Follow these steps:
Step 1: Open the Screen Capture Toolbar
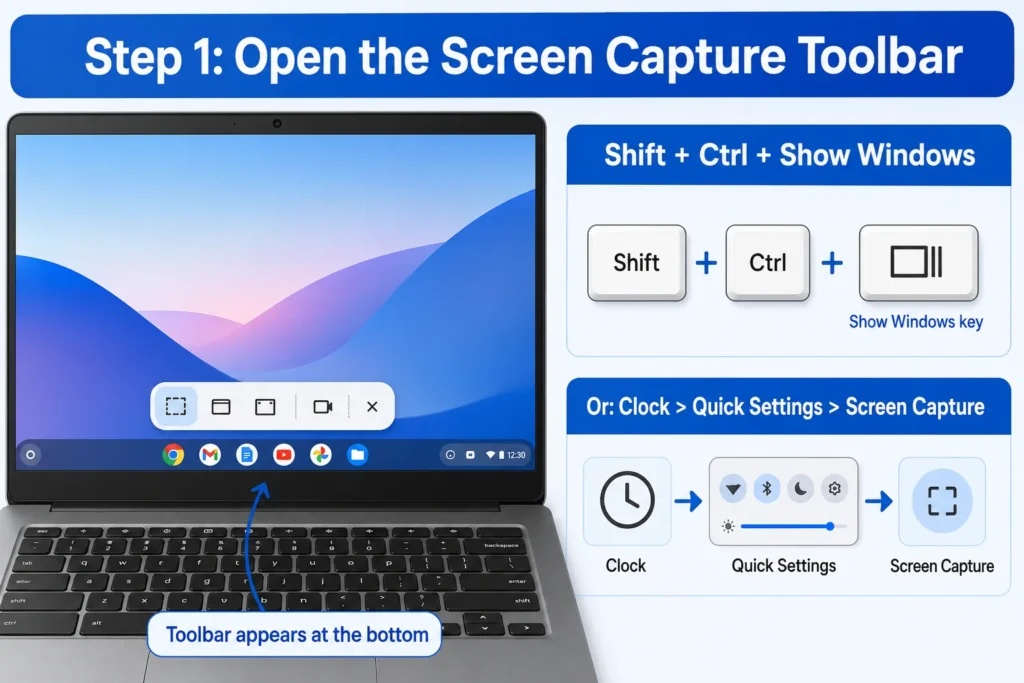
Press:
Shift + Ctrl + Show Windows
The Show Windows key looks like a rectangle with two vertical lines and is usually located where the F5 key appears on traditional keyboards.
You can also:
- Click the clock.
- Open Quick Settings.
- Select Screen Capture.
The recording toolbar will appear at the bottom of your screen.
Step 2: Select Video Recording
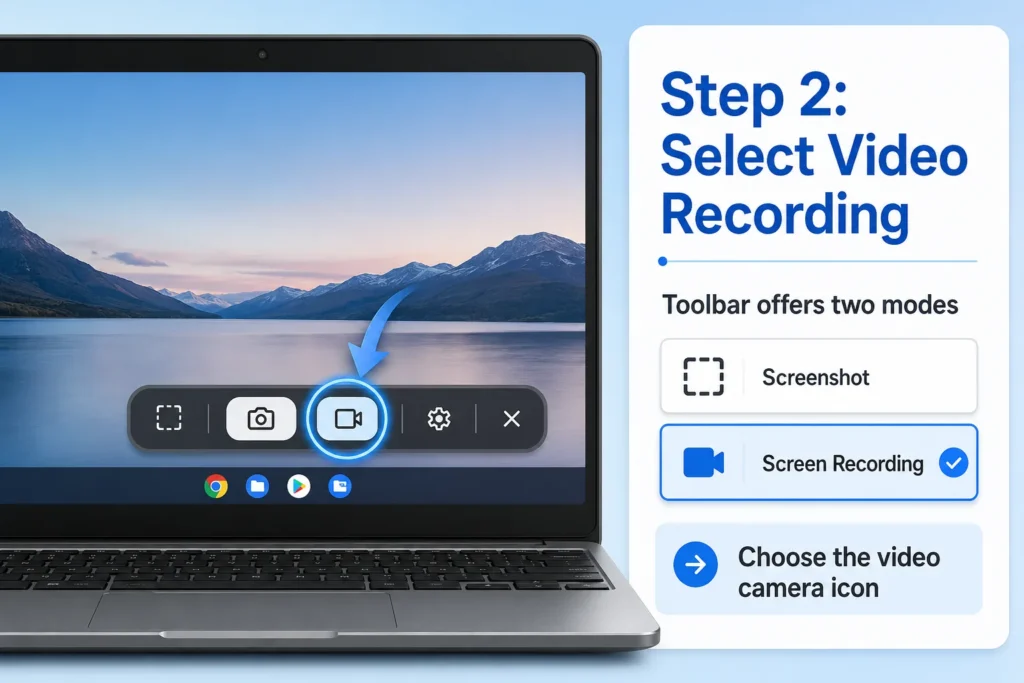
The toolbar offers two modes:
- Screenshot
- Screen Recording
Choose the video camera icon to switch to recording mode.
Step 3: Choose What to Record
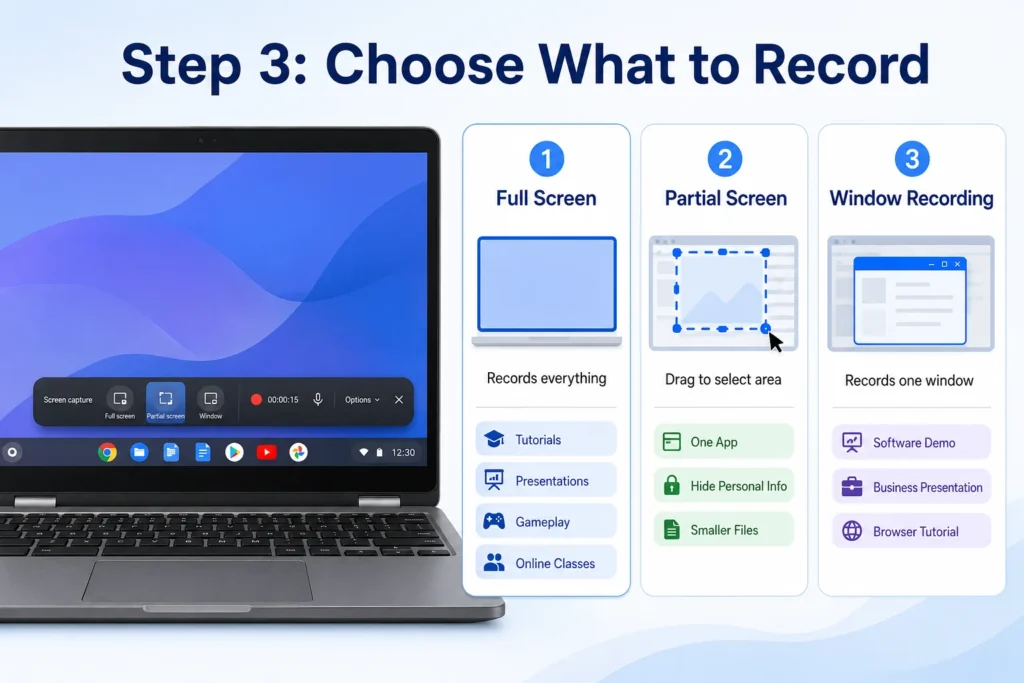
ChromeOS gives you three recording options:
Full Screen
Records everything displayed on your screen.
Best for:
- Tutorials
- Presentations
- Gameplay
- Online classes
Partial Screen
Lets you drag a box around the area you want to record.
Ideal when:
- You only need one application
- You want to hide personal information
- You want smaller video files
Window Recording
Records only one application window.
Useful for:
- Demonstrating software
- Business presentations
- Browser tutorials
Step 4: Configure Recording Settings
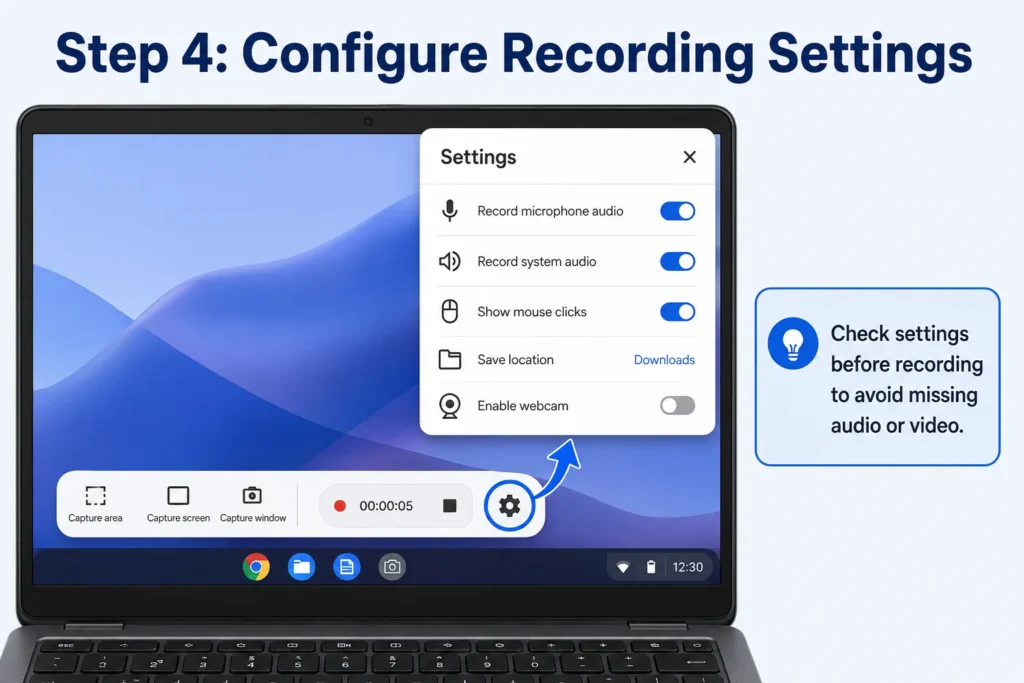
Before recording, click the Settings (gear icon).
Available options may include:
- Record microphone audio
- Record system audio (supported on newer ChromeOS versions)
- Show mouse clicks
- Save location
- Enable webcam (on supported devices)
Checking these settings before recording helps avoid missing important audio or video.
Step 5: Start Recording
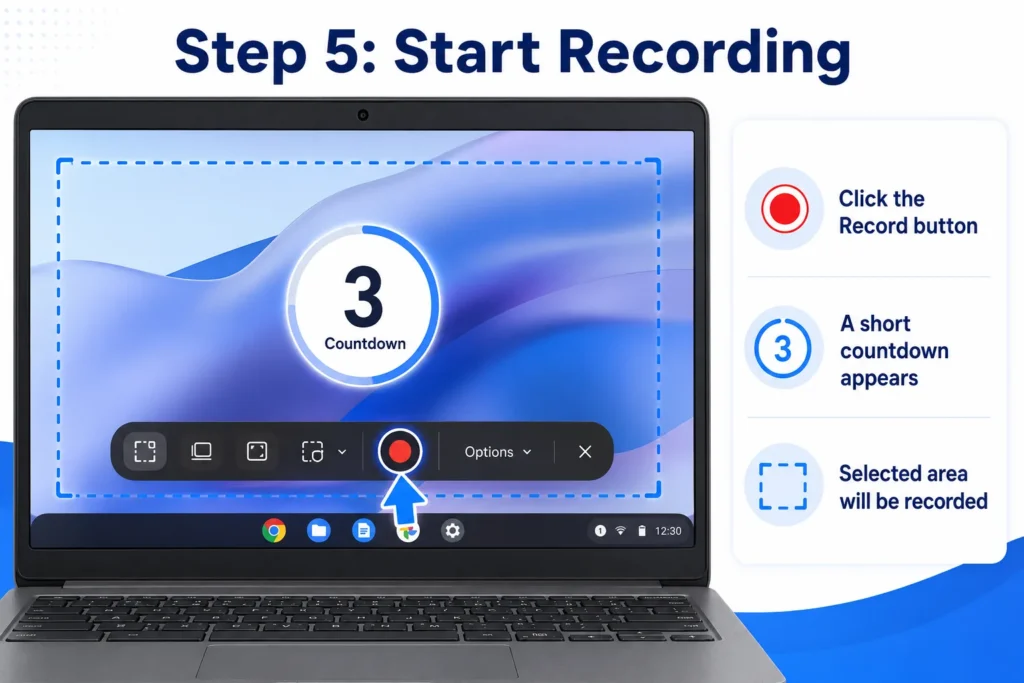
Click the Record button.
A short countdown appears before recording begins.
After the countdown, everything within the selected area will be recorded.
Step 6: Stop Recording
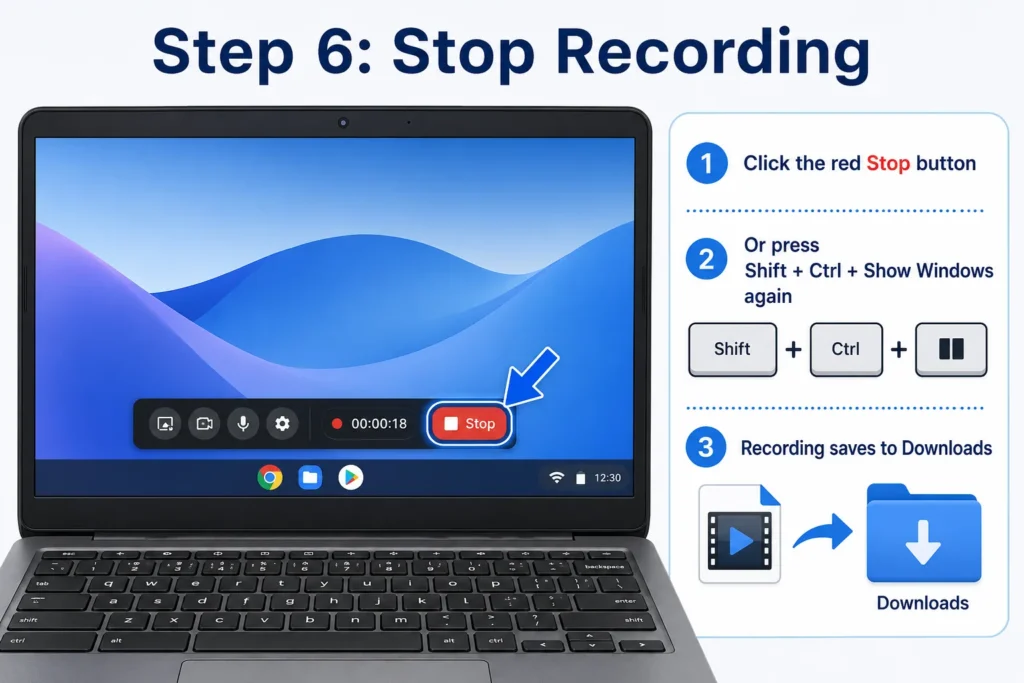
When you’re finished:
- Click the red Stop button on the shelf.
- Or press Shift + Ctrl + Show Windows again.
The recording automatically saves to your Downloads folder unless you’ve selected another location.
Where Are Chromebook Screen Recordings Saved?
By default, ChromeOS stores recordings in:
Files → Downloads
Your videos are usually saved in WEBM format.
You can:
- Rename the file
- Move it to Google Drive
- Copy it to external storage
- Share it through email or messaging apps
Keeping recordings organized makes them easier to locate later.
How to Record Audio While Recording Your Screen
Audio often makes screen recordings much more useful.
Before starting:
- Open Screen Capture.
- Click the gear icon.
- Enable Microphone.
If your Chromebook supports internal audio recording, you’ll also see an option to record system sounds.
If system audio isn’t available, an external microphone can still capture your voice clearly.
Can You Record Yourself with the Webcam?
Many newer Chromebooks allow webcam recording alongside screen capture.
When enabled:
- Your webcam appears as a floating camera bubble.
- You can move it anywhere on the screen.
- Viewers can see both your screen and your face simultaneously.
This feature is excellent for:
- Online teaching
- YouTube tutorials
- Product demonstrations
- Training videos
Keyboard Shortcut for Faster Recording
Instead of navigating menus every time, use this shortcut:
Shift + Ctrl + Show Windows
This instantly opens the Screen Capture toolbar.
Learning keyboard shortcuts saves time if you record frequently.
Edit Your Screen Recording
ChromeOS doesn’t include advanced editing software, but you can still make basic improvements.
Simple edits include:
- Trimming unwanted sections
- Renaming videos
- Uploading to Google Drive
- Sharing directly
For more advanced editing, you can use video editors such as:
- Clipchamp
- CapCut
- WeVideo
- Adobe Express
These tools provide transitions, text, effects, and audio editing for more polished videos.
Common Problems and Their Solutions
Even though Chromebook recording is simple, occasional issues can occur.
Screen Recorder Isn’t Showing
Update ChromeOS to the latest version.
Restart your Chromebook if the feature still doesn’t appear.
No Microphone Audio
Check:
- Microphone permission
- Recording settings
- Connected headset
- ChromeOS privacy settings
Test the microphone before recording important videos.
Video Looks Choppy
Close unnecessary browser tabs and applications.
Having fewer programs running allows ChromeOS to dedicate more resources to recording.
Storage Is Full
Large recordings require free space.
Delete unnecessary files or move older videos to Google Drive.
Best Tips for Better Screen Recordings
Small improvements can make your recordings look much more professional.
Plan Before Recording
Know exactly what you’ll demonstrate.
Preparing reduces mistakes and unnecessary pauses.
Clean Your Desktop
Remove personal files and close unrelated applications.
A clean screen looks more professional.
Use a Quiet Environment
Background noise can distract viewers.
Recording in a quiet room improves audio quality.
Test Before Recording Long Videos
Record a short sample first.
Verify:
- Video quality
- Audio clarity
- Webcam placement
- Recording area
This prevents discovering problems after finishing a lengthy recording.
Keep Notifications Off
Enable Do Not Disturb mode to prevent notifications from appearing during your recording.
Best Alternative Screen Recording Apps
Although the built-in recorder works well for most users, some people need additional features.
Popular alternatives include:
- Loom
- Screencastify
- OBS Studio (supported on many newer Chromebooks)
- Nimbus Screenshot & Screen Video Recorder
These applications offer advanced editing, cloud storage, annotations, and collaboration features.
Is Chromebook’s Built-in Recorder Enough?
For most users, absolutely.
It provides everything needed for:
- School assignments
- Online learning
- Work presentations
- Tutorials
- Customer support
- Simple YouTube videos
Unless you require professional editing or advanced streaming tools, the built-in recorder is more than capable of handling everyday recording tasks.
Final Thoughts
Learning how to use the built-in screen recorder on ChromeOS is a valuable skill that can save both time and money. Instead of downloading third-party software, most Chromebook users already have everything they need to capture tutorials, presentations, meetings, and educational content.
With features like full-screen recording, partial capture, microphone support, webcam integration, and simple file management, ChromeOS offers an easy and reliable recording experience for beginners and experienced users alike. Once you’ve practiced a few times, creating high-quality screen recordings becomes quick and effortless.
More Details : How to Add Page Numbers in Word: A Complete Step-by-Step Guide
FAQs
1. Does every Chromebook have screen recording?
Most modern Chromebooks running updated versions of ChromeOS include a built-in screen recording feature.
2. Can I record both my screen and microphone?
Yes. Enable the microphone option in the Screen Capture settings before you begin recording.
3. Where do Chromebook screen recordings get saved?
They are usually saved in the Downloads folder unless you choose another location.
4. Can I record only one part of the screen?
Yes. The built-in recorder lets you capture the full screen, a specific window, or a selected area.
5. Do I need to install additional software?
No. The built-in Screen Capture tool is sufficient for most everyday recording tasks.