
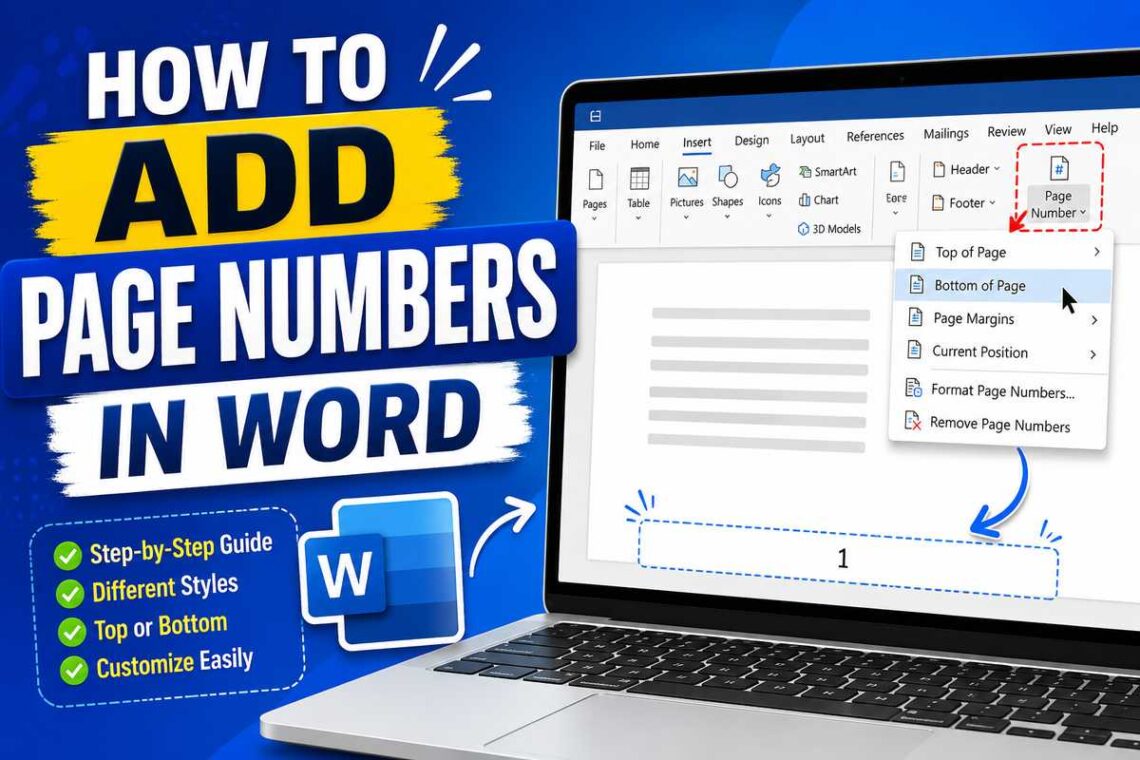
Creating a professional document isn’t just about well-written content. Small formatting details, such as page numbers, make a document easier to read, organize, and reference. Whether you’re preparing a school assignment, business report, research paper, eBook, or resume, page numbers help readers navigate your document with ease.
Microsoft Word offers several ways to insert and customize page numbers. You can place them at the top or bottom of the page, start numbering from any page, skip the cover page, use Roman numerals, or even restart numbering in different sections.
In this guide, you’ll learn every important method in a simple, step-by-step way so you can confidently format any Word document.
Why Page Numbers Matter
Page numbers are more than just small digits at the top or bottom of a document. They improve organization and make long documents easier to navigate.
Some common situations where page numbers are useful include:
- School and college assignments
- Research papers
- Business proposals
- Books and eBooks
- User manuals
- Legal documents
- Project reports
Without page numbers, readers may struggle to locate specific sections, especially in lengthy documents.
How to Add Page Numbers in Word
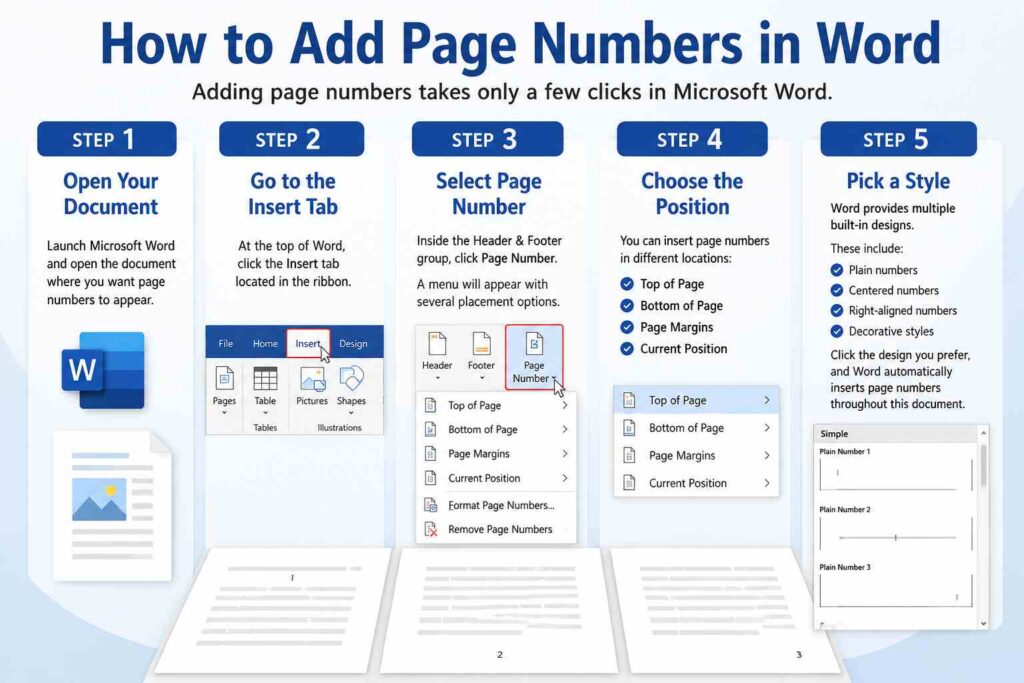
Adding page numbers takes only a few clicks in Microsoft Word.
Follow these simple steps:
Step 1: Open Your Document
Launch Microsoft Word and open the document where you want page numbers to appear.
Step 2: Go to the Insert Tab
At the top of Word, click the Insert tab located in the ribbon.
Step 3: Select Page Number
Inside the Header & Footer group, click Page Number.
A menu will appear with several placement options.
Step 4: Choose the Position
You can insert page numbers in different locations:
- Top of Page
- Bottom of Page
- Page Margins
- Current Position
Choose the location that best matches your document style.
Step 5: Pick a Style
Word provides multiple built-in designs.
These include:
- Plain numbers
- Centered numbers
- Right-aligned numbers
- Decorative styles
Click the design you prefer, and Word automatically inserts page numbers throughout the document.
How to Remove Page Numbers
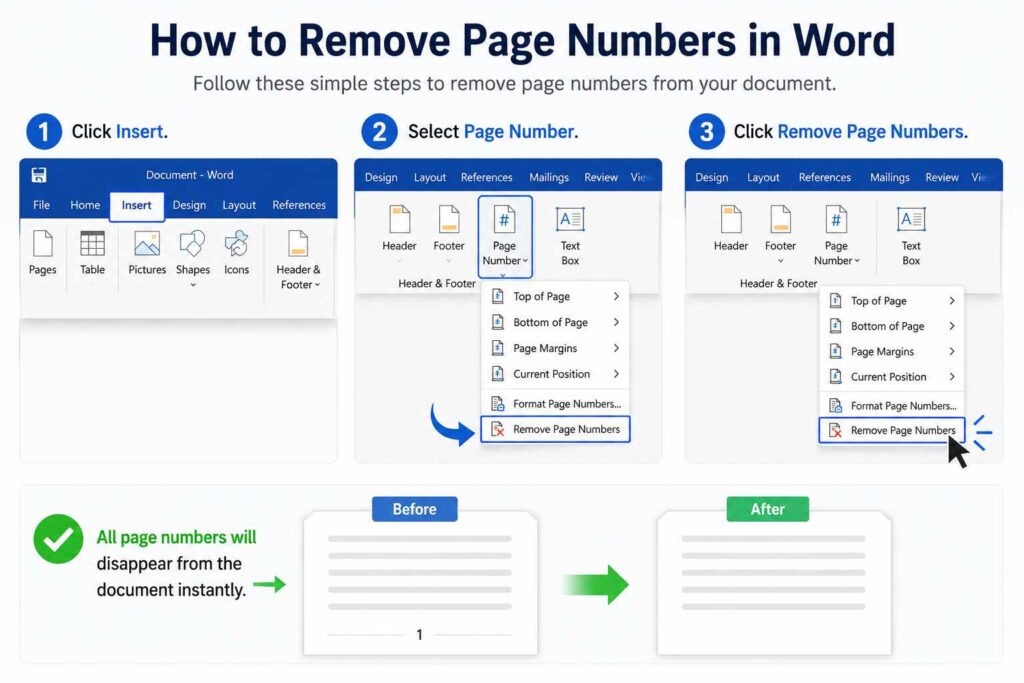
If you decide you no longer need numbering, removing it is equally simple.
Follow these steps:
- Click Insert.
- Select Page Number.
- Click Remove Page Numbers.
All page numbers will disappear from the document instantly.
How to Start Page Numbers on the Second Page
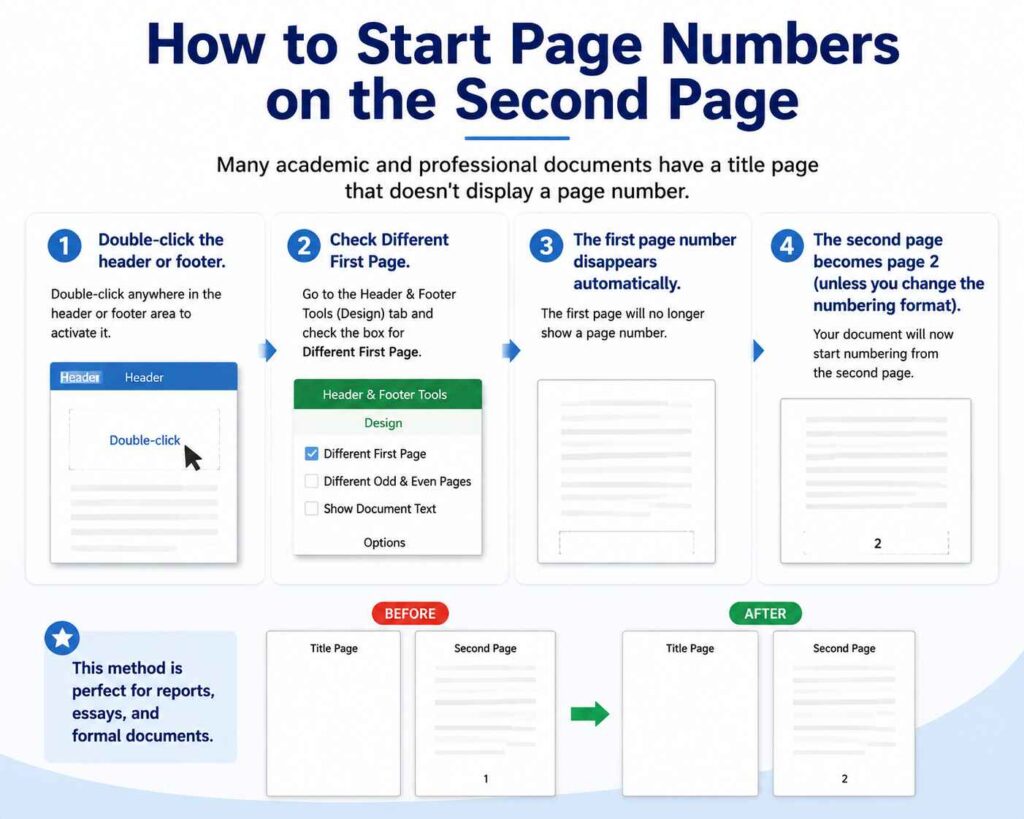
Many academic and professional documents have a title page that doesn’t display a page number.
Here’s how to do that:
- Double-click the header or footer.
- Check Different First Page.
- The first page number disappears automatically.
- The second page becomes page 2 unless you change the numbering format.
This method is perfect for reports, essays, and formal documents.
How to Start Numbering from Page 1 on the Second Page
Sometimes you want the cover page to remain unnumbered while the second page displays page 1.
Here’s how:
- Enable Different First Page.
- Click Page Number.
- Choose Format Page Numbers.
- Select Start at.
- Enter 0.
The cover page remains blank, while the next page begins with page 1.
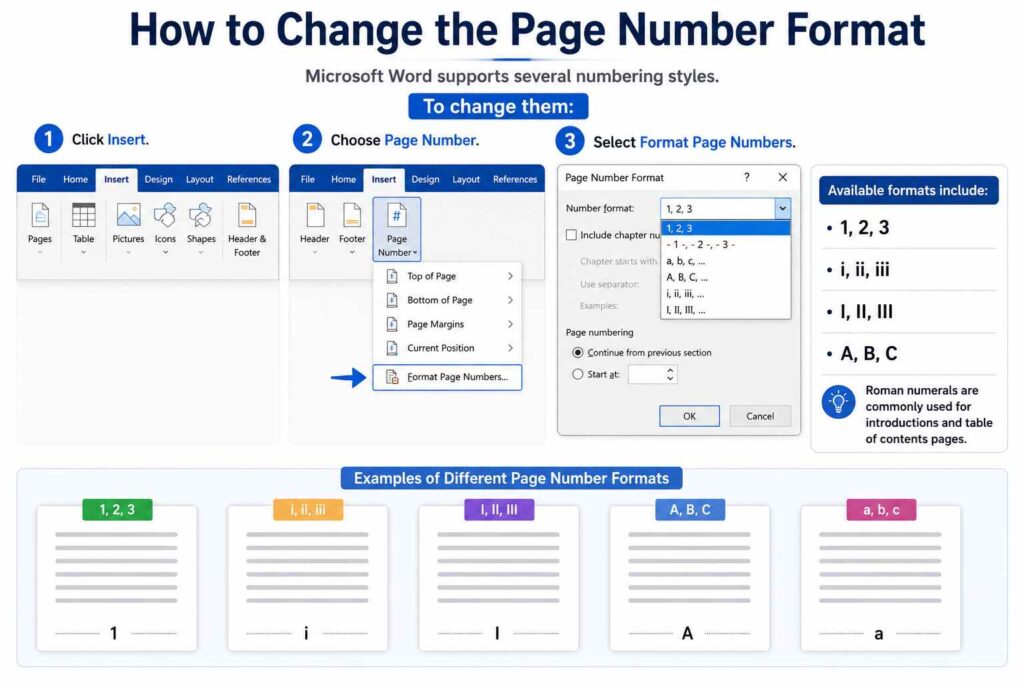
How to Change the Page Number Format
Microsoft Word supports several numbering styles.
To change them:
- Click Insert.
- Choose Page Number.
- Select Format Page Numbers.
Available formats include:
- 1, 2, 3
- i, ii, iii
- I, II, III
- A, B, C
Roman numerals are commonly used for introductions and table of contents pages.
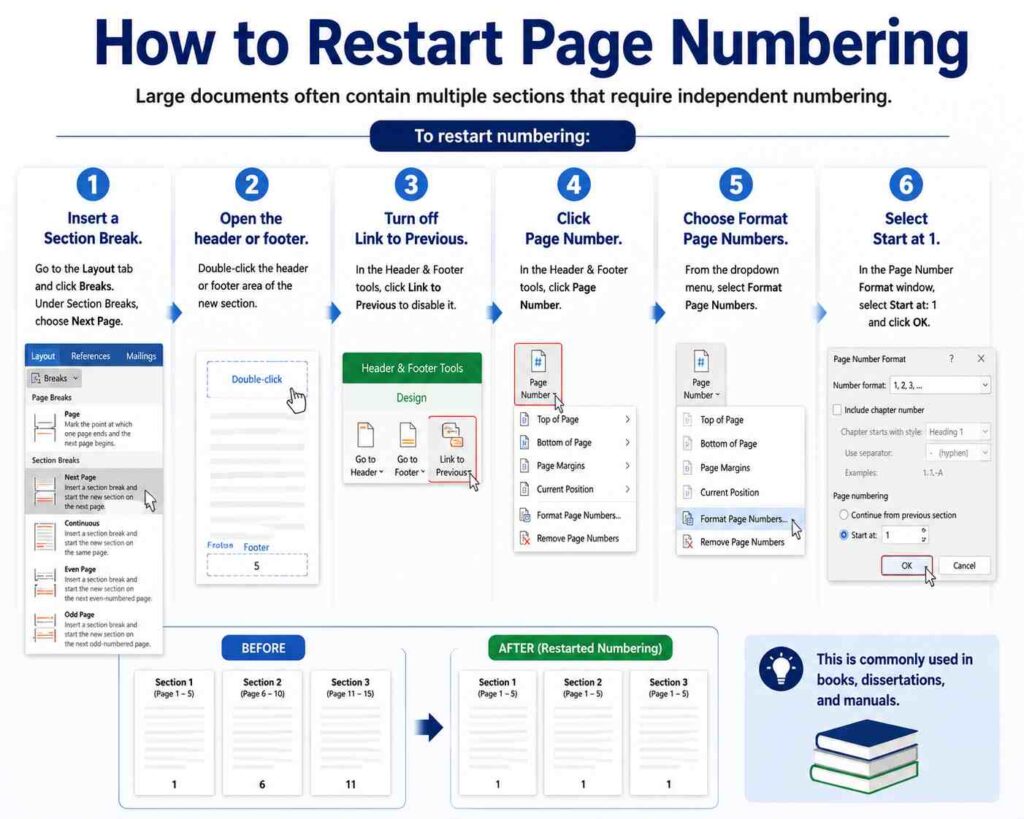
How to Restart Page Numbering
Large documents often contain multiple sections that require independent numbering.
To restart numbering:
- Insert a Section Break.
- Open the header or footer.
- Turn off Link to Previous.
- Click Page Number.
- Choose Format Page Numbers.
- Select Start at 1.
This is commonly used in books, dissertations, and manuals.
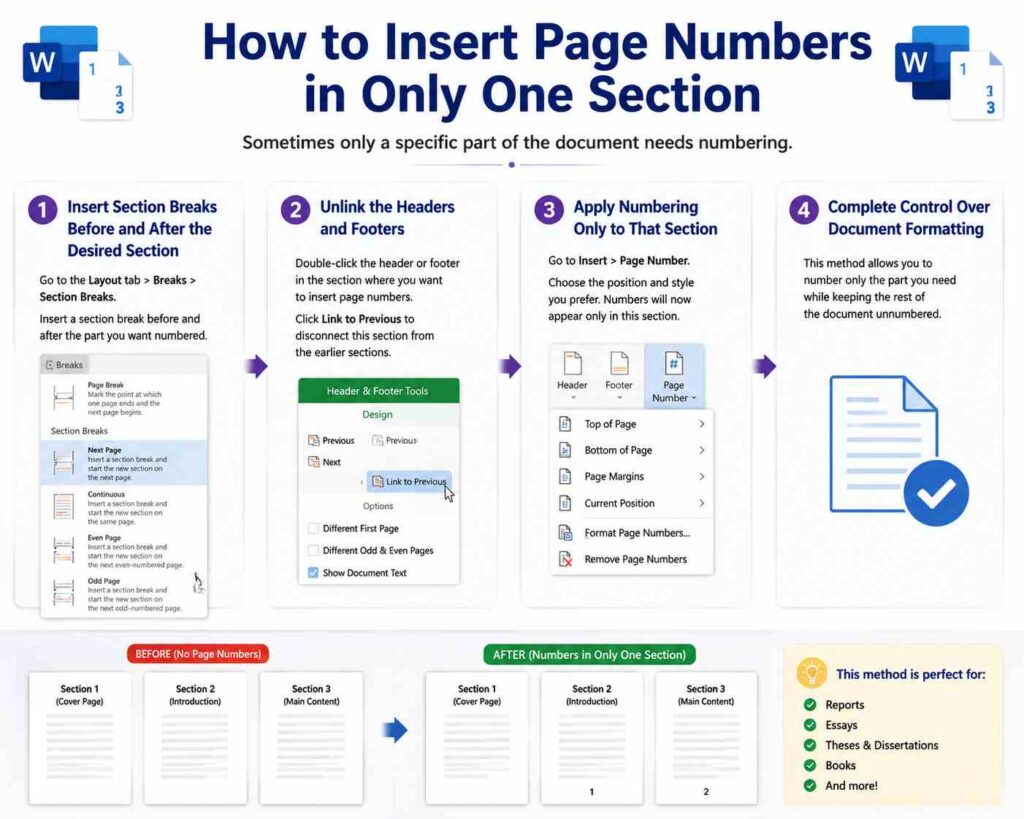
How to Insert Page Numbers in Only One Section
Sometimes only a specific part of the document needs numbering.
To accomplish this:
- Insert section breaks before and after the desired section.
- Unlink the headers and footers.
- Apply numbering only to that section.
This allows complete control over document formatting.
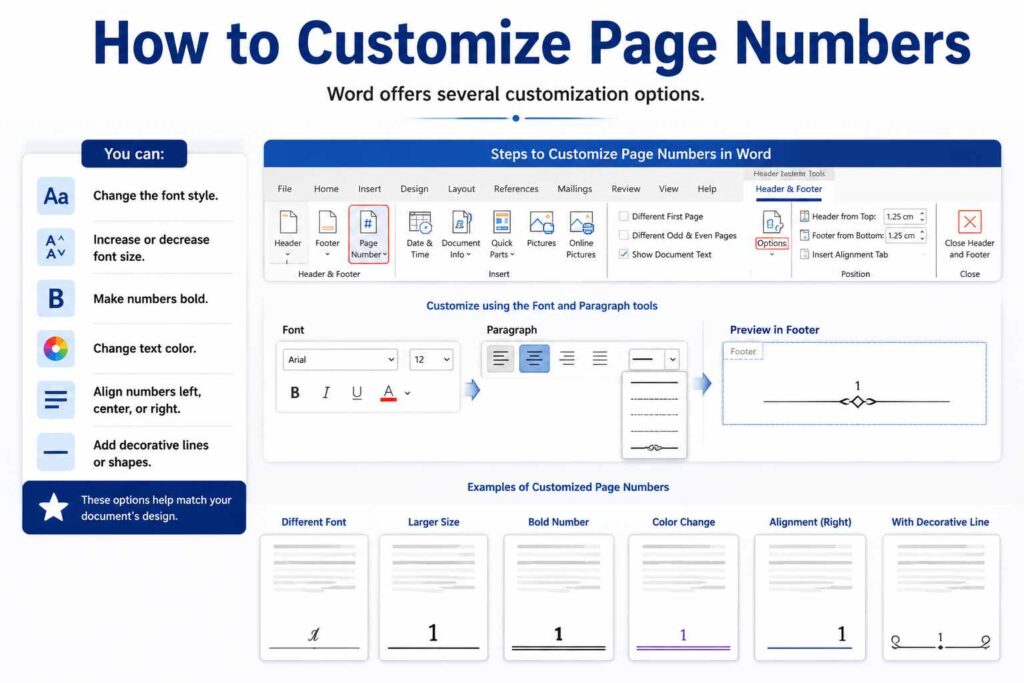
How to Customize Page Numbers
Word offers several customization options.
You can:
- Change the font style.
- Increase or decrease font size.
- Make numbers bold.
- Change text color.
- Align numbers left, center, or right.
- Add decorative lines or shapes.
These options help match your document’s design.
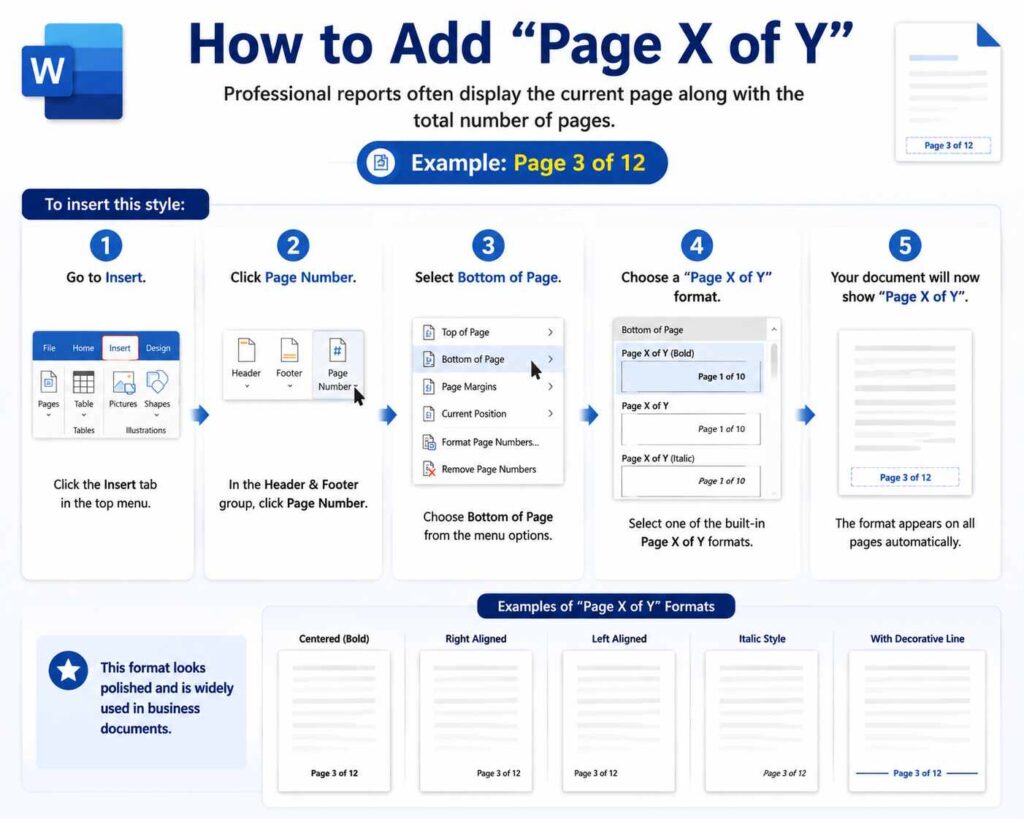
How to Add “Page X of Y”
Professional reports often display the current page along with the total number of pages.
Example:
Page 3 of 12
To insert this style:
- Go to Insert.
- Click Page Number.
- Select Bottom of Page.
- Choose one of the built-in Page X of Y formats.
This format looks polished and is widely used in business documents.
How to Add Page Numbers to the Header
Many formal documents place page numbers at the top.
To do this:
- Select Insert.
- Click Page Number.
- Choose Top of Page.
- Select your preferred alignment.
The numbers will automatically appear on every page.
How to Add Page Numbers to the Footer
The footer is the most popular location for page numbering.
To insert numbers there:
- Open Insert.
- Select Page Number.
- Choose Bottom of Page.
- Pick your favorite style.
This layout is commonly used for assignments and reports.
Common Page Number Problems and Their Solutions
Even experienced Word users occasionally face formatting issues.
Page Numbers Won’t Start at 1
Usually, the numbering continues from a previous section.
Open Format Page Numbers and choose Start at 1.
Page Numbers Appear on the Cover Page
Enable the Different First Page option in the Header & Footer settings.
Numbering Changes Unexpectedly
Check whether section breaks have been inserted accidentally.
Deleting unnecessary section breaks often fixes the issue.
Header and Footer Stay Linked
Click Link to Previous to disable the connection before making changes.
Missing Page Numbers
If page numbers disappear, reopen the header or footer and verify that the numbering hasn’t been deleted.
Tips for Creating Professional Documents
A well-formatted document leaves a strong impression.
Consider these best practices:
- Keep page numbers in the same location throughout the document.
- Use simple numbering styles for professional reports.
- Skip numbering on title pages when appropriate.
- Use Roman numerals for front matter if required.
- Preview your document before printing.
- Save your work after formatting.
These small details improve readability and presentation.
Final Thoughts
Learning how to format page numbers is a valuable Microsoft Word skill that saves time and improves document quality. Whether you’re creating a simple assignment or a lengthy report, Word provides flexible options for placing, formatting, restarting, and customizing page numbers.
Once you understand section breaks, numbering formats, and header or footer settings, you can create documents that look clean, organized, and professional. Spend a few minutes practicing these techniques, and you’ll be able to format nearly any document with confidence.
(FAQs)
1. How do I insert page numbers in Microsoft Word?
Go to the Insert tab, click Page Number, choose the location, and select a numbering style.
2. Can I hide the page number on the first page?
Yes. Open the header or footer and enable the Different First Page option.
3. How do I restart page numbering in Word?
Insert a section break, unlink the header or footer, then choose Format Page Numbers and set the numbering to start at 1.
4. Can I use Roman numerals for page numbers?
Yes. Open Format Page Numbers and choose the Roman numeral style from the Number Format list.
5. Why are my page numbers not showing correctly?
The most common causes are linked sections, incorrect numbering settings, or accidental section breaks. Checking these settings usually resolves the problem.