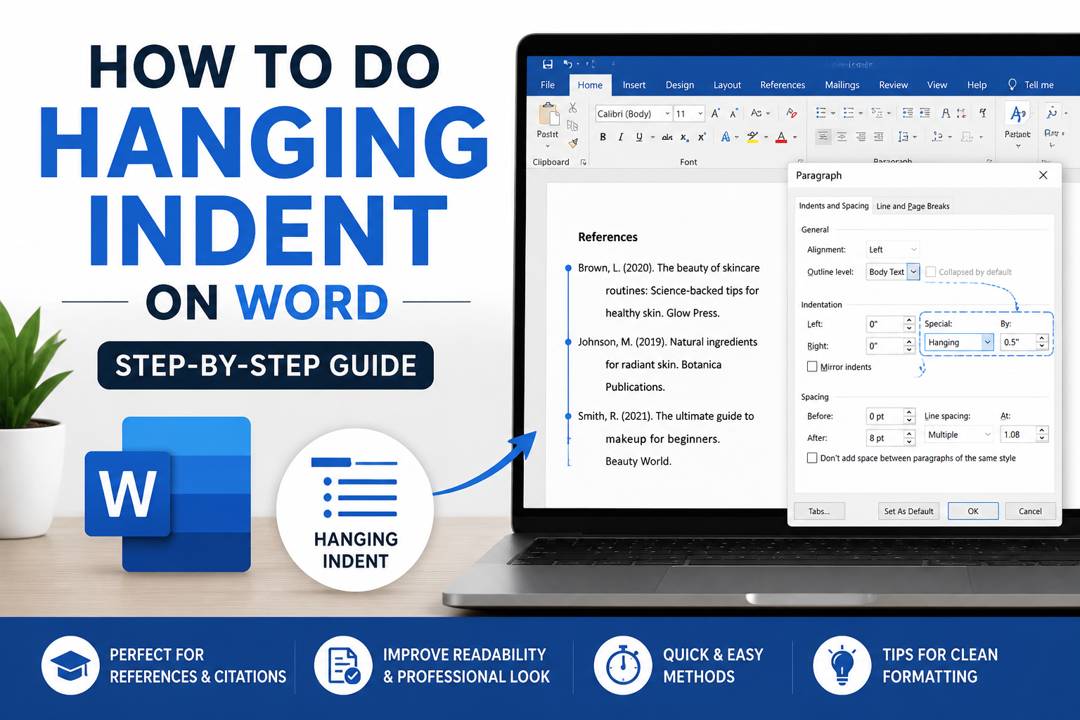
Formatting a document properly can completely change how professional and readable it looks. Whether you’re working on an academic paper, a resume, a blog draft, or even structured notes for a beauty or lifestyle article, clean formatting makes your content stand out. One of the most useful formatting techniques you’ll come across is the hanging indent, especially when dealing with references, citations, or bibliographies.
If you’ve ever wondered how to make your document look more polished and organized, learning how to do hanging indent on Word is a small but powerful skill. It helps create structured spacing where the first line stays aligned to the left margin while the rest of the paragraph is indented. This is commonly used in APA, MLA, and Chicago style writing.
In this guide, you’ll learn everything in a simple, beginner-friendly way. From step-by-step instructions to shortcuts and formatting tips, this article will help you master clean document styling in Microsoft Word. Even if you’re not tech-savvy, you’ll be able to apply it in seconds and improve the look of your work instantly.
What is a Hanging Indent and Why It Matters
A hanging indent is a formatting style where the first line of a paragraph sits at the margin, while all the remaining lines are pushed slightly inward. It creates a clean visual structure that makes lists, references, and citations easier to read.
This style is widely used in academic writing and professional documentation because it improves readability and organization. Instead of a block of text, the content appears neatly layered and structured.
When people search for how to do hanging indent on Word, they are usually trying to format reference lists, bibliography entries, or citation pages. It’s also helpful in resumes when listing achievements or job responsibilities.
A hanging indent is not just about style—it’s about clarity. It helps readers quickly scan important information without getting lost in long paragraphs.
How to Do Hanging Indent on Word: Step-by-Step Guide
Learning how to do hanging indent on Word is simple once you understand the basic methods. Microsoft Word offers multiple ways to apply it depending on your preference.
Below are the easiest methods you can use.
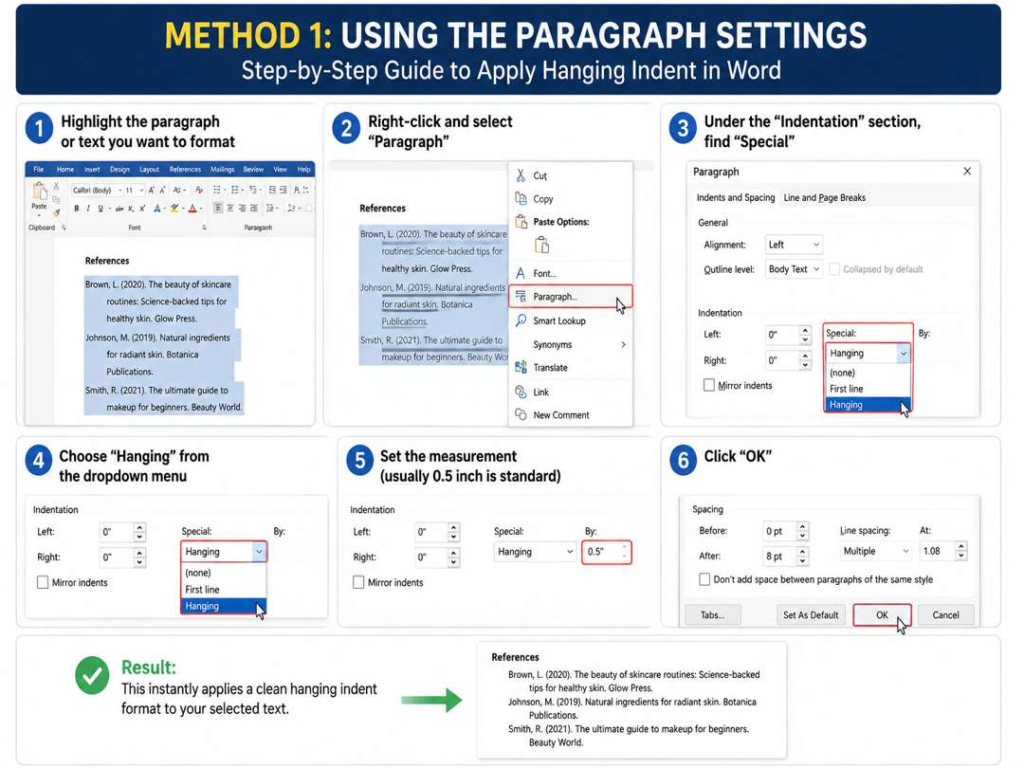
Method 1: Using the Paragraph Settings
This is the most common and accurate method.
- Highlight the paragraph or text you want to format
- Right-click and select “Paragraph”
- Under the “Indentation” section, find “Special”
- Choose “Hanging” from the dropdown menu
- Set the measurement (usually 0.5 inch is standard)
- Click “OK”
This instantly applies a clean hanging indent format to your selected text.
Method 2: Using the Ruler Tool
If you prefer visual adjustments, the ruler method is perfect.
- Go to the “View” tab
- Enable the “Ruler” option
- Select your paragraph
- On the ruler, you will see two markers (top triangle and bottom triangle)
- Drag the bottom triangle slightly to the right
- Leave the top triangle at the margin
This method is quick and gives you more control over spacing.
Method 3: Keyboard Shortcut Approach
While Word doesn’t offer a direct one-click shortcut for hanging indents, you can speed up formatting using:
- Ctrl + T → Increase hanging indent
- Ctrl + Shift + T → Decrease hanging indent
These shortcuts are especially useful when working with long documents.
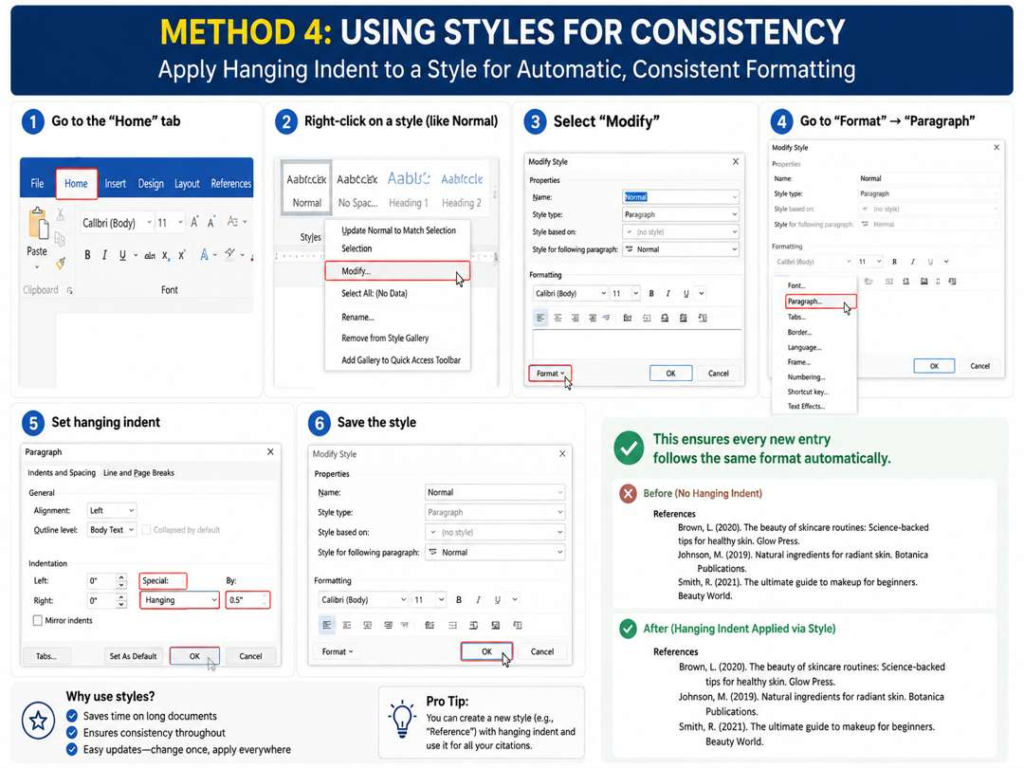
Method 4: Using Styles for Consistency
If you’re working on a long document, consistency matters.
- Go to the “Home” tab
- Right-click on a style (like Normal)
- Select “Modify”
- Go to “Format” → “Paragraph”
- Set hanging indent
- Save the style
This ensures every new entry follows the same format automatically.
How to Do Hanging Indent on Word in Different Versions
Different versions of Microsoft Word may look slightly different, but the process remains almost the same.
Word 2016 and Word 2019
- Use the Paragraph dialog box method
- Ruler tool is available in the View tab
- Layout tab also provides indentation options
Microsoft Word 365
- Has a smoother interface
- Ruler tool is easier to access
- Style-based formatting is more advanced
Older Versions of Word
- You may need to manually enable the ruler
- Paragraph settings may appear under “Format” menu instead of right-click
Even though layouts differ, the core process of how to do hanging indent on Word remains consistent across all versions.
Common Mistakes and How to Fix Them
Many beginners struggle with hanging indents due to small mistakes. Here are the most common issues and how to solve them.
1. Incorrect Indent Size
Using too large or too small indentation can ruin formatting.
Fix: Stick to 0.5 inches for most academic styles.
2. Applying to Wrong Text
Sometimes users apply formatting to the wrong paragraph or selection.
Fix: Always highlight the full reference or paragraph before applying changes.
3. Ruler Misalignment
Dragging the wrong marker on the ruler can cause formatting errors.
Fix: Remember—top triangle controls first line, bottom triangle controls hanging lines.
4. Style Conflicts
Pre-set styles in Word may override manual formatting.
Fix: Modify styles instead of applying random formatting.
Professional Formatting Tips for Clean Documents
Good formatting isn’t just technical—it improves presentation and readability.
Here are some expert tips:
- Keep consistent spacing throughout your document
- Use hanging indents only where needed (like citations or references)
- Avoid mixing multiple indentation styles
- Combine hanging indent with proper line spacing for clarity
- Always preview your document before final submission
These small adjustments can make your work look polished and professional, especially in academic or content writing environments.
When to Use Hanging Indents
Understanding when to apply this formatting is just as important as learning how to do hanging indent on Word.
You should use it in:
- Academic references (APA, MLA, Chicago styles)
- Bibliography or works cited pages
- Professional reports
- Resumes (for listing job roles or achievements)
- Structured notes or documentation
It is especially useful in content-heavy documents where clarity matters.
Why Hanging Indents Improve Readability
Hanging indents are not just aesthetic—they serve a functional purpose. They make information easier to scan, especially in long reference lists.
When applied correctly, readers can quickly identify the beginning of each entry while still following the detailed information underneath. This improves user experience and reduces visual clutter.
That’s why professionals, students, and writers rely on this formatting technique in nearly every structured document.
Conclusion
Learning formatting tools in Microsoft Word can dramatically improve the quality of your documents, and hanging indents are one of the most useful skills you can master. Whether you are a student, writer, or professional, understanding how to do hanging indent on Word helps you create clean, readable, and well-structured content.
Once you get comfortable with the steps, it becomes second nature. You can apply it using the Paragraph settings, ruler tool, or even styles for faster workflow. The key is consistency and correct usage.
So the next time you’re working on references, citations, or structured lists, try using this formatting method. It will instantly give your document a more professional look. If you found this guide helpful, feel free to share your experience or ask questions in the comments.
More Details : How to Wrap a Burrito: A Simple, Expert Guide to Perfect Rolling Every Time
FAQs
What is a hanging indent used for in Word?
A hanging indent is mainly used for citations, references, and bibliographies. It helps organize text so the first line stays aligned while the rest is indented for better readability.
How do I quickly apply a hanging indent in Word?
You can quickly apply it by using the Paragraph settings or pressing Ctrl + T to increase indentation. This is the fastest method for formatting text.
Can I remove a hanging indent once applied?
Yes, you can remove it by going back to Paragraph settings and selecting “None” under Special indentation or adjusting the ruler back to normal.
Why is my hanging indent not working in Word?
This usually happens due to style conflicts or incorrect selection. Make sure you highlight the correct text and check style settings.
Is hanging indent the same in all Word versions?
Yes, the concept is the same across all versions, but the location of tools may vary slightly between Word 2016, 2019, and 365.